Whole Wheat Sourdough Sandwich Bread Recipe: Soft & Nutritious
To make whole wheat sourdough sandwich bread, start by feeding a mature starter with equal parts whole wheat flour and water for peak activity. Mix whole wheat and bread flours at about 80% hydration, autolyse 1–2 hours, then add salt.
Use gentle stretch-and-folds every 30 minutes during 5–12 hours of bulk fermentation at 75–79°F to build gluten. Shape tightly, proof until risen, and bake initially at 450°F with steam for crust development.
Explore further for detailed techniques and tips.
Key Takeaways
- Use a blend of whole wheat and bread flour with about 75-85% hydration for balanced gluten and soft crumb suitable for sandwiches.
- Feed and maintain a mature, bubbly sourdough starter that doubles in volume within 4-12 hours to ensure strong fermentation.
- Perform 3-5 gentle stretch and folds during bulk fermentation at 75-79°F to develop gluten without tearing the dough.
- Shape dough tightly into a loaf, proof until it rises about one inch over the pan edge, then bake at 450°F with steam initially.
- Store bread in a paper bag or bread box and slice with a serrated knife for best texture and sandwich quality.
Easy Whole Wheat Sourdough Sandwich Bread Recipe at a Glance
| Ingredient / Step | Details & Notes |
|---|---|
| Flour | Blend whole wheat flour with bread flour for balanced gluten & crumb texture |
| Hydration | Use 75–85% water absorption (adjust based on flour type & freshness) |
| Starter | Feed a mature sourdough starter that doubles within 4–12 hours |
| Salt | Add 1.9–2% of flour weight to enhance flavor & regulate fermentation |
| Autolyse | Rest flour & water mix for 1–2 hours before adding starter & salt |
| Bulk Fermentation | 5–12 hours at 75–79°F, with stretch-and-folds every 30 mins |
| Shaping | Shape into a tight log, place in a loaf pan, proof until dough rises 1 inch above pan |
| Baking | Bake at 450°F with steam for 20–30 mins, then lower to 400–450°F to finish |
| Cooling & Storage | Cool completely, store in a paper bag or airtight container up to 5 days, freeze up to 3 months |
Ingredients Needed for the Recipe
When crafting whole wheat sourdough bread, you’ll primarily work with whole wheat flour blended with bread flour to balance gluten development and crumb texture.
Whole wheat flour contributes bran and germ, increasing water absorption and requiring higher hydration—typically 75% to 85%. Stoneground whole wheat is preferred for a more assertive, deep flavor and better texture because it preserves more bran and germ.
Whole wheat sourdough blends whole wheat and bread flour for balanced gluten and higher hydration needs.
Using medium or high-protein bread flour improves gluten strength, ensuring a well-structured crumb. You may also use high extraction flour to reduce bran’s harshness while preserving gluten integrity. Choosing the right vanilla extract flavor profile can enhance subtle flavor notes in your bread’s crust and crumb.
Salt, usually 1.9% to 2% of flour weight, enhances flavor and controls fermentation. Water temperature should be warm, 25°C to 29°C, to optimize yeast activity.
Optional ingredients include small amounts of wheat germ for nutrition and fermentation support.
Minimalism is key: flour, water, salt, and starter form the foundation, avoiding sweeteners or fats to maintain traditional sourdough character.
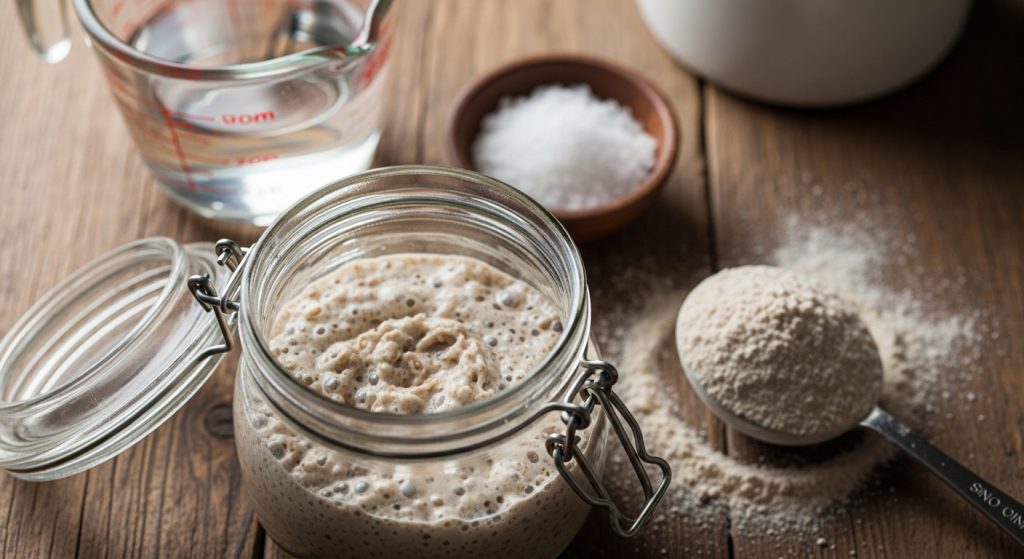
Preparing the Sourdough Starter
You’ll feed your sourdough starter with equal parts whole wheat flour and water at regular intervals, starting every 24 hours and increasing to every 12 hours by day six.
Watch for key indicators like bubbles, foam, and doubling in volume to confirm active fermentation. The starter’s consistency should resemble pancake batter for optimal activity, and using a digital baking scale ensures precise ingredient measurements for consistent results.
Proper maintenance includes discarding half the starter before each feeding and storing it in a controlled environment to sustain yeast vitality.
Starter Feeding Schedule
Although sourdough starter activity varies with temperature, maintaining a consistent feeding schedule is essential for predictable fermentation. At around 76°F (24°C), feed your starter every 12 hours to keep it ripe and active. This consistency mirrors the controlled conditions that contribute to the fermentation process in sourdough baking.
In warmer conditions, twice-daily feedings at set times (e.g., 9 a.m. and 9 p.m.) help maintain regularity. Discard about half the starter before each feeding to control volume and acidity. Discarding some starter during each feeding helps prevent overgrowth and keeps the starter manageable.
Adjust timing if your starter doesn’t double, increasing feedings to every 8–12 hours.
Use a 1:1:1 or 1:2:2 starter:water:flour ratio by weight, maintaining 100% hydration.
Employ whole wheat or mixed flours to strengthen culture.
Keep ambient temperature between 70–76°F for ideal activity.
Use lukewarm water (~85°F) during feedings to stimulate yeast growth.
Signs of Activity
As you prepare your sourdough starter, recognizing clear signs of activity is essential for ensuring successful fermentation. Look for bubbles on the surface, volume doubling within 4–12 hours post-feeding, and a foamy layer indicating robust microbial action.
Texture should shift to light, airy, and slightly stretchy, while aroma evolves from faint to pleasantly tangy. Using latex-free gloves during feeding and handling can help maintain starter hygiene and prevent contamination.
These indicators confirm yeast and bacteria are thriving.
Consistent rise and bubbling over multiple feedings demonstrate a healthy microbial balance.
| Sign | Indicator |
|---|---|
| Bubbles | Surface and internal gas |
| Volume | Doubles or triples post-feed |
| Texture | Light, airy, stretchy |
| Aroma | Mildly tangy, fruity |
| Float Test | Starter floats in water |
Monitor these signs closely to gauge starter readiness and optimize your whole wheat sourdough bread’s leavening potential.
Starter Maintenance Tips
When maintaining your sourdough starter, consistent feeding ratios and proper flour selection play critical roles in sustaining microbial activity and ensuring reliable fermentation.
Use a feeding ratio of 1 part starter to 4 parts water and 4 parts flour by weight. This refreshment involves feeding the starter with flour and water to keep it active and healthy.
Opt for mostly unbleached bread or all-purpose flour, supplementing occasionally with nutrient-rich rye flour to maintain vigor.
Always use filtered or dechlorinated water at room temperature to avoid microbial shock.
Store your starter according to baking frequency. Refrigerate if baking weekly or feed daily at room temperature for more frequent use.
Key maintenance tips include:
- Discard part of the starter before feeding to balance acidity.
- Stir thoroughly to prevent dry clumps.
- Use wide-mouth jars for easy handling.
- Monitor aroma and texture for health assessment regularly.
Mixing and Hydrating the Dough
Because whole wheat flour absorbs water differently than white flour, you’ll want to start by combining the flour and water to guarantee full hydration before adding other ingredients. Hold back some water to adjust hydration after initial mixing. Freshly milled flour, in particular, requires careful hydration adjustments due to its higher enzymatic activity and water absorption.
Start by mixing whole wheat flour with water to ensure full hydration before adding other ingredients.
Use a dough whisk or wet hands to mix until no dry flour remains, forming a shaggy mass. If using a mechanical mixer, add water first to prevent flour sticking.
Adjust water temperature to target dough temperature, ensuring consistent fermentation. Dough hydration levels significantly influence mixing and gluten formation, so monitoring water amounts carefully is crucial.
After autolyse—resting the flour-water mix for 1–2 hours—you’ll add starter, salt, and reserved water gradually, mixing until the dough feels cohesive, elastic, and slightly aerated. Adding salt after autolyse helps regulate yeast activity and strengthens gluten structure.
Proper mixing develops gluten without overworking, which is essential for whole wheat’s bran-impacted hydration and dough extensibility. Incorporating vital wheat gluten can further enhance dough elasticity and improve loaf volume when working with whole grain flours.
Bulk Fermentation and Folding Techniques
You’ll want to monitor bulk fermentation closely, aiming for a 60-75% rise at around 75-79°F to balance flavor and dough strength.
Incorporate gentle stretch and folds every 30 minutes to develop gluten without tearing the whole wheat dough.
Temperature control is key, as warmer conditions speed fermentation and require adjustments to folding and timing.
Regular feeding with fresh flour and water rejuvenates the microbial community, stimulating fermentation and enhancing flavor and texture.
Optimal Fermentation Timing
Although bulk fermentation timing varies based on temperature and starter activity, aiming for 5 to 12 hours guarantees ideal gluten development and dough maturity in whole wheat sourdough.
Warmer conditions speed fermentation, while cooler or refrigerated environments extend it, allowing for enhanced flavor with overnight bulk ferment. You’ll know the dough is ready when it’s puffy, slightly risen, and holds its shape without overinflating.
Keep these points in mind for excellent timing:
- Maintain bulk fermentation temperature between 74°F to 86°F (23°C to 30°C) for balanced yeast and bacterial activity.
- Use longer fermentation (up to 12 hours) with lower starter percentages (5-10%) to develop complexity.
- Space stretch and fold sets every 30 to 60 minutes during the first 2-4 hours to build strength, remembering that gentle handling helps prevent gluten damage and maintains rise.
- After final folds, let dough rest undisturbed to complete fermentation and gluten alignment.
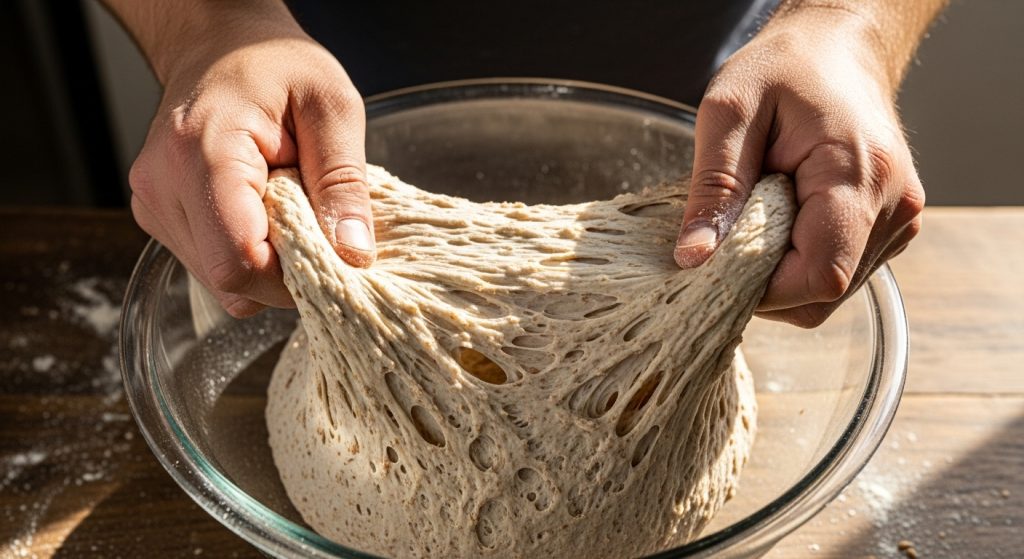
Effective Folding Methods
Mastering effective folding methods during bulk fermentation is essential for developing the gluten network and structure in whole wheat sourdough dough.
Use the stretch and fold technique by gently stretching the dough upward with wet fingertips and folding it toward the bowl’s center. This technique complements kneading done by a KitchenAid mixer dough hook to enhance gluten development efficiently.
Perform four folds per set, rotating the dough 90° each time, repeating 3 to 5 sets at 30–60 minute intervals. This builds dough elasticity and traps air without kneading. The first set of stretch and fold is typically done about 30 minutes into bulk rise, with subsequent sets spaced according to dough hydration and type to optimize gluten development and fermentation timing and hydration.
For high hydration whole wheat doughs, coil folding is beneficial; it involves lifting and folding the dough inward to create tension while preserving gas bubbles. Maintaining proper hydration and temperature during folding is critical for achieving a well-risen dough with a good crumb structure.
Always keep hands moist to prevent sticking, and avoid tearing to maintain dough strength. Proper folding enhances gluten development, elasticity, and crumb openness, vital for a well-risen, airy sandwich bread.
Temperature Impact on Fermentation
When you control dough temperature between 24° and 25°C (75.2°–77°F), you effectively regulate fermentation speed for whole wheat sourdough, preventing overproofing and preserving dough strength.
This temperature range slows enzymatic gluten degradation and balances microbial activity, ensuring ideal dough extensibility and resilience.
Bulk fermentation timing varies with temperature, so you assess progress by dough rise percentage rather than fixed time. Cooler temperatures (24°–25°C) extend fermentation to 3–3.5 hours, enhancing gluten development.
Above 26°C, fermentation accelerates, increasing dough slackness and tearing risk. Use temperature-retentive containers like ceramic bowls to maintain consistent dough heat.
Adjust bulk fermentation length based on rise percentage to avoid premature overproofing and preserve dough integrity.
Because sourdough fermentation relies on wild yeasts and bacteria, maintaining the proper temperature range supports their optimal activity and flavor development.
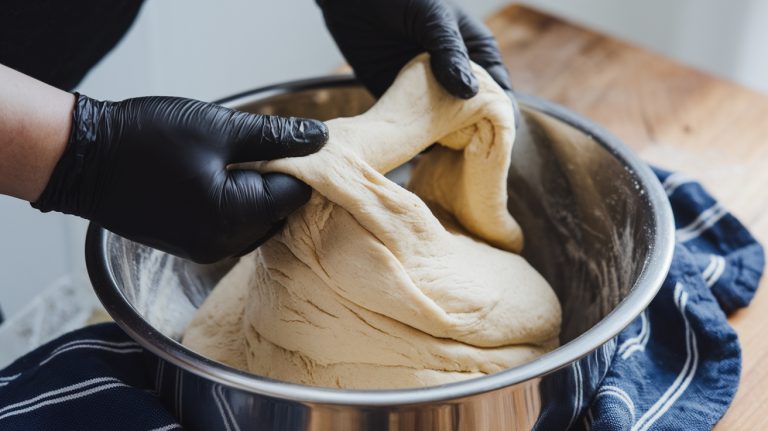
Shaping and Proofing the Loaf
Once the bulk fermentation is complete and your dough has risen to a puffy state without over-deflation, you’ll gently turn it out onto a lightly floured surface to begin shaping. Using a flexible bowl scraper can help transfer the dough efficiently without sticking.
Flatten the dough into a rectangle matching your loaf pan’s width, then perform letter folds or fold edges to the center to build tension and structure.
Pre-shape into a loose round to enhance gluten development before final shaping. Proper kneading ensures the dough is smooth and ready for rising, which improves the final texture.
For the final shape, fold corners inward and roll into a tight log, maintaining surface tension by pinching the seam underneath.
Place the loaf seam-side down in a greased pan, smoothing the top and tucking loose sides for a uniform rise.
Cover and proof in a warm, draft-free spot until the dough rises about one inch over the pan edge, ensuring ideal oven spring without over-proofing. It is important to cover the dough with a damp cloth during this second rise to prevent drying out.
Baking Tips and Temperature Guidelines
After shaping and proofing your loaf, controlling the baking environment and temperatures directly affects crust development and crumb structure. Preheat your oven and Dutch oven to 450°F (230-235°C) for at least 30 minutes to guarantee even heat.
Using a thermometer to monitor the oven temperature ensures consistent baking conditions and optimal results. Additionally, adjusting the amount of water in the dough can influence the final texture of your bread.
Properly preheat your oven and Dutch oven to 450°F for optimal crust and crumb results.
Bake with the lid on for the first 20-30 minutes to trap steam, promoting oven spring and a crisp crust. Then, remove the lid and reduce the temperature to 400-450°F (205-232°C) to brown the crust evenly without burning.
Use the hollow sound test on the loaf’s bottom to verify doneness before cooling. Preheat baking vessel thoroughly for consistent heat transfer.
Maintain high initial temperature for ideal oven spring. Trap steam by baking covered, then uncover to brown crust. Adjust temperature in final phase to prevent overbrowning.
Serving Suggestions and Storage Methods
Although whole wheat sourdough sandwich bread boasts a hearty texture and rich flavor, you can enhance its versatility through thoughtful serving and storage practices.
Serve it toasted with butter or use it for sandwiches featuring eggs, deli meats, or avocado. It also absorbs egg mixtures well, making it ideal for sourdough French toast. Using a 1.5-pound loaf pan for baking ensures a perfect size for standard sandwiches.
When storing, cool the loaf completely, then keep it in airtight plastic bags at room temperature for up to five days. For extended storage, freeze in airtight bags for up to three months and thaw at room temperature before slicing. Avoid refrigeration to prevent drying and staling.
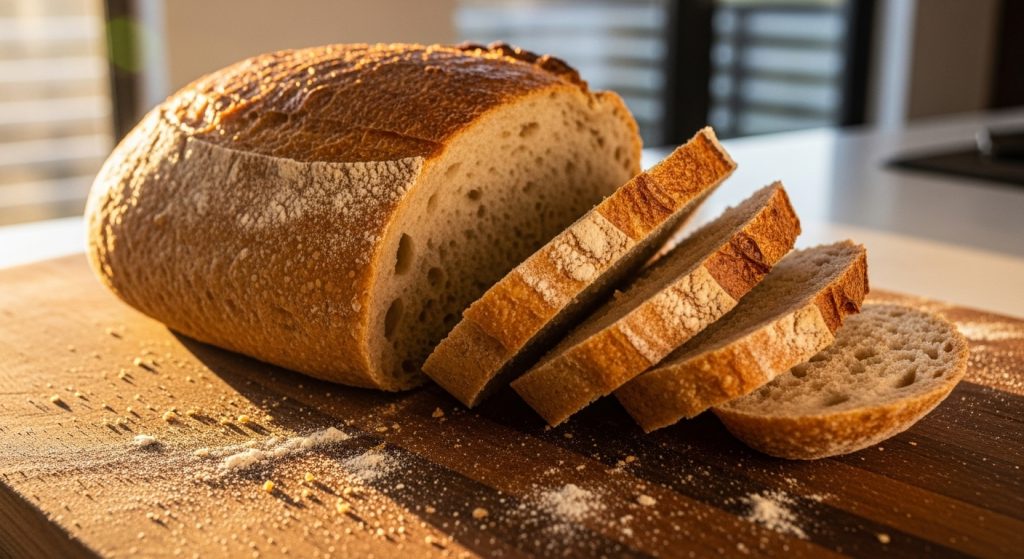
Use a serrated knife for even slices, and consider warming slightly before serving to restore softness and enhance flavor.
Frequently Asked Questions
Can I Substitute Whole Wheat Flour With Spelt or Rye Flour?
Yes, you can substitute whole wheat flour with spelt or rye, but adjust ratios carefully. Use spelt at 20-25% substitution for a nuttier flavor and lighter texture, noting its lower gluten weakens dough strength.
Rye works best at 5-10%, as it increases density and demands higher hydration. Expect fermentation changes; spelt speeds up rising, rye adds acidity—and manage proofing to maintain bread quality and texture.
How Does Altitude Affect Sourdough Fermentation Times?
At higher altitudes, lower air pressure speeds up sourdough fermentation by increasing gas expansion in the dough.
You’ll need to reduce bulk fermentation and proofing times to avoid over-proofing and dough collapse.
The yeast or starter becomes more active, so cutting back starter quantity and using cooler water helps slow fermentation.
Also, expect drier conditions, so increase hydration slightly to maintain dough consistency and prevent overly slack or tough dough.
What Are Common Signs of Over-Proofed Dough?
You might think an airy crumb is always good, but over-proofed dough shows large, uneven holes with thin membranes and a fragile, collapsed structure.
You’ll notice a flat or spread-out loaf, dull crust, and lack of oven spring. The dough won’t spring back when poked and feels weak or wet.
Scoring may cause deflation, and the dough often exceeds typical volume, signaling gluten breakdown from extended fermentation.
Can I Use a Different Type of Sweetener or Omit It Entirely?
Yes, you can substitute sweeteners like honey, maple syrup, molasses, or low-calorie options like erythritol-based sweeteners, adjusting hydration for liquids.
Each affects fermentation differently; liquid sweeteners feed yeast and deepen crust color, while erythritol doesn’t impact fermentation.
Omitting sweetener entirely is possible; expect longer fermentation, less browning, and a denser crumb.
Monitor dough closely and start with small amounts to maintain balanced fermentation and desired texture.
How Do I Revive a Sluggish or Inactive Sourdough Starter?
You see a sluggish starter, smell a faint sourness, notice no bubbles.
Revive it by discarding most, saving a small portion. Feed it equal weights of starter, lukewarm filtered water, and whole wheat or rye flour.
Stir hooch in or pour off before each feeding.
Keep it warm at 75°F, feed every 12 hours, and watch for doubling and bubbles.
Repeat until active. Discard if pink mold or foul odors appear.
Perfect Sandwiches With Homemade Whole Wheat Sourdough
Now that you’ve mastered each step—from prepping your starter to perfecting your bake—you’re well on your way to making whole wheat sourdough sandwich bread that’s both nutritious and delicious. Remember, practice makes perfect, so don’t be discouraged if your first loaf isn’t flawless.
Keep refining your technique, and soon you’ll be slicing into a crusty, flavorful masterpiece every time. With patience and precision, you’re truly baking bread that rises to the occasion.