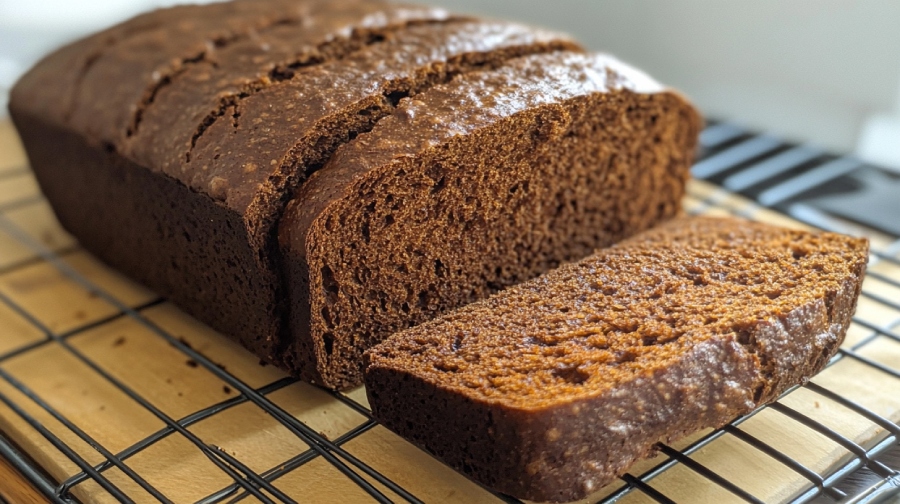
Sourdough Pumpernickel Bread Recipe: Smile in Every Bite
To make sourdough pumpernickel bread, start with a bubbly, active sourdough starter. Mix it with warm water and molasses, then gradually incorporate dark rye flour, all-purpose flour, and salt.
Allow your dough to hydrate for an hour before adding oil and optional seeds. Let it ferment and rise at room temperature for 8-10 hours. Shape the dough, then cold-proof it if desired.
Preheat your oven to 450°F, score the dough, and bake in a Dutch oven for crispy crust perfection. Experience the unique flavors and textures that unfold through each step, waiting for you to explore further.
Key Takeaways
- Use a bubbly, well-fed sourdough starter along with dark rye and all-purpose flour for a flavorful base.
- Incorporate molasses for sweetness and color; optional ingredients like cocoa powder and caraway seeds enhance flavor complexity.
- Allow dough to hydrate for an hour, then rest for 8-10 hours to develop flavor and texture.
- Bake at 450°F, covered for 30 minutes, then uncovered until the internal temperature reaches 205-210°F.
- Cool completely on a wire rack before storing in an airtight container for optimal freshness.
Ingredients Overview
When you’re preparing to make sourdough pumpernickel bread, it’s vital to gather the right ingredients for the best results. Start with an active sourdough starter, as it’s the foundation for your bread’s rise and flavor.
You’ll need dark rye flour, which imparts that rich, earthy taste, and all-purpose flour to provide a lighter texture. For sweetness and color, don’t forget to add molasses. A well-fed starter is fundamental for peak fermentation, so verify yours is active and bubbly for the best outcome essential tools for baking.
To enhance the flavor profile, consider incorporating cocoa powder and caraway seeds; they add depth and a unique twist. The balance of textures is key, so use a combination of 190g of bread flour, 120g of rye flour, and 10g of salt.
If you want to elevate the taste even further, dark malt powder is an excellent choice, while optional fennel seeds can offer a personal touch.
Accuracy is paramount, so use a kitchen scale to measure your ingredients precisely. Each gram matters in achieving that perfect sourdough pumpernickel bread you’re aiming for.
Dough Preparation Steps
To start the dough preparation, you’ll mix your active sourdough starter with coffee and molasses, creating a smooth base. This adds a unique flavor profile to the bread, enhancing its richness.
Next, gradually add the rye, wheat, and bread flour along with salt to enhance the dough’s flavor and texture. Incorporating whole rye flour will contribute to a denser loaf, as noted in the benefits of rye flour.
After letting the dough hydrate for an hour, you can incorporate oils and seeds, setting the stage for a rich and complex flavor profile.
Ingredient Mixing Techniques
Measuring and combining all dry ingredients is essential for achieving a balanced flavor and texture in your sourdough pumpernickel bread.
Begin by accurately measuring dark rye flour, bread flour, cocoa powder, and salt. Mixing these dry ingredients thoroughly in a large bowl guarantees even distribution and ideal hydration, which is vital for gluten-free baking mixing and preparing the dough.
Next, prepare the wet mixture by combining your active sourdough starter with warm water and molasses. Stir until fully dissolved, creating a cohesive liquid base that promotes fermentation.
Once your wet ingredients are ready, gradually incorporate the dry mixture into the wet, using a Danish dough whisk or spatula. This helps avoid lumps and guarantees you achieve a consistent dough texture.
After mixing, allow the dough to hydrate for about an hour. This hydration period is vital for flour absorption and enhances the overall structure of your dough.
Once the time’s up, gently fold in any optional ingredients like caraway or fennel seeds. Make sure to distribute them evenly without overworking the dough, which can negatively affect its texture.
Hydration and Resting Period
Achieving the perfect hydration and resting period for your dough is vital for developing flavor and texture in your sourdough pumpernickel bread. Start by mixing all your ingredients until they form a cohesive ball. This initial mixing allows the flour to absorb moisture, which typically takes about one hour fully.
Once the dough is hydrated, incorporate 25g of oil to improve moisture retention in the dough’s structure. Proper temperature management during this phase can greatly influence fermentation outcomes.
Next, let your dough rest for 8-10 hours at room temperature. This extended resting period is essential for promoting fermentation and enhancing flavor. While the dough may not visibly double in size during this time, it should appear puffy, indicating that it’s ready for pre-shaping.
After the resting phase, you can introduce additional seeds or flavorings, but only after the initial period has passed.
Incorporating Flavor Enhancements
A careful selection of flavor enhancements can transform your sourdough pumpernickel bread into a standout loaf. Start by incorporating 40g of molasses into your dough mixture. This addition not only brings a touch of sweetness but also deepens the color, enriching the flavor profile.
Additionally, consider the benefits of mastering your sourdough starter for a more robust fermentation process that elevates the overall taste. Next, consider adding 5-10g of caraway seeds; their distinct flavor complements the rye beautifully, offering a traditional touch.
For an extra layer of complexity, toss in 10-15g of fennel seeds. Their subtle anise-like flavor will harmonize with the other ingredients, making each bite a delight.
As you mix these enhancements into your dough, don’t forget to hydrate it properly. Allow the dough to rest for 1 hour after mixing. This vital step guarantees that the flour fully absorbs moisture, resulting in a cohesive and textured dough.
To elevate the taste even further, replace water with 385g of room temperature coffee. This substitution introduces a slight bitterness that balances the sweetness from the molasses, creating a richer overall taste experience.
Bulk Proofing Techniques
Bulk proofing is a vital step in crafting your sourdough pumpernickel bread, as it develops both flavor and structure.
During this stage, gluten development is enhanced, allowing the dough to trap gases effectively and create a better rise. Aim for a duration of 5 to 10 hours at room temperature, allowing the dough to rise to about 75% of its final volume.
You’ll recognize proper rise by its shiny, domed surface, indicating that it’s packed with air bubbles and ready for the next stage.
For more on evaluating gluten strength, refer to the windowpane test.
Importance of Bulk Proofing
The process of bulk proofing is essential for developing the rich flavors and robust structure of your sourdough pumpernickel bread. This significant stage allows the dough to rest and ferment, typically for 8 to 10 hours. During this time, you’ll notice several important changes:
- Flavor Development: Longer fermentation leads to deeper, more complex flavors in your bread.
- Volume Increase: The dough should rise to about 75% of its final volume, indicating sufficient fermentation.
- Appearance Changes: Look for a shiny, domed surface as air bubbles form and gluten strengthens.
- Reduced Stickiness: Proper bulk proofing helps decrease stickiness, making the dough easier to handle during shaping.
The environment in which you bulk-proof also plays a crucial role. A warm area speeds up fermentation, while cooler conditions slow it down, increasing flavor complexity.
Ideal Bulk Proofing Duration
With the foundation of successful bulk proofing laid, understanding the ideal duration for this process is key to achieving the best results in your sourdough pumpernickel bread. Aim for approximately 8 to 10 hours at room temperature. This timeframe allows for sufficient fermentation and flavor development, critical to the unique taste of pumpernickel.
During this period, you’ll want your dough to rise to about 50-75% of its final volume. This increase indicates that the dough has developed the necessary strength and structure to support its final shape.
Keep in mind that factors like room temperature and dough hydration can influence this timing, so be prepared to make adjustments based on your specific conditions.
As you monitor the dough, look for a shiny, domed appearance, which signifies that the fermentation process is progressing well.
If you prefer a more complex flavor, consider overnight cold-proofing in the refrigerator. This method extends the proofing duration to 8 to 36 hours, enhancing the flavor and texture of your final loaf.
Signs of Proper Rise
A successful rise in your sourdough pumpernickel bread reflects the effectiveness of your fermentation techniques.
During bulk proofing, you’ll want to look for specific signs that indicate your dough is ready for shaping. Here are four key indicators:
- Volume: The dough should rise to about 75% of its final volume, even if it doesn’t visibly double, particularly with rye-based recipes.
- Surface Appearance: A shiny, domed surface should emerge, accompanied by visible bubbles. This suggests that air has been effectively trapped during fermentation.
- Poke Test: Perform a gentle poke test. If the dough springs back slowly, it’s ready; an immediate spring means it’s under-proofed and needs more time.
- Texture: Finally, the dough should feel elastic and slightly tacky. This texture indicates successful gluten development, which is essential for a good rise.
Shaping the Dough
After allowing the dough to rise, it’s time to shape it for the final stage. Begin by pre-shaping the dough into a loose ball or oblong shape. This step helps build surface tension, which is essential for the loaf’s structure. Once you’ve pre-shaped it, cover the dough with a damp cloth and let it rest for about 20 minutes to relax the gluten.
Next, for the final shaping, gently stretch the dough into a rectangle. Fold the edges toward the center, creating a taut surface on top. This tightness will aid in achieving a great rise during baking.
Finally, place the shaped dough seam side up in a well-floured banneton or proofing basket to maintain its shape. If the dough feels overly sticky, dust it with flour as needed. Remember to handle it gently to preserve the air pockets developed during fermentation.
Here’s a quick reference table for shaping:
| Step | Description | Time |
|---|---|---|
| Pre-shape | Form into a loose ball or oblong shape | – |
| Resting | Cover with a damp cloth, relax gluten | 20 minutes |
| Final shaping | Stretch into a rectangle, fold edges inward | – |
| Proofing | Place seam side up in a floured banneton | Until ready |
Cold Proofing Methods
Cold-proofing transforms your dough into a flavorful masterpiece. Refrigerating your shaped dough for 8 to 36 hours allows the fermentation process to slow down, resulting in a more complex flavor and improved crust texture. Here’s how to do it effectively:
- Temperature Control: Aim for a cool environment, ideally between 35°F to 45°F (1.5°C to 7°C). This temperature range slows down fermentation while still allowing it to continue.
- Cover Loosely: Cover your dough loosely with plastic wrap or a damp cloth. This keeps the dough from drying out while maintaining moisture and softness.
- Monitor Time: Experiment with different cold proofing durations. Longer times often yield richer flavors and better crust characteristics, so try 24 hours for a more developed taste.
- Observe the Skin: During cold proofing, the dough develops a skin that makes scoring easier. This results in better oven springs and delightful crust blisters when baked.
Baking Instructions
With the dough cold-proofed and ready, you’ll want to create the perfect environment for baking. Start by preheating your oven to 450°F (230°C) and place your Dutch oven inside to heat for at least 30 minutes. This step is essential for generating the steam needed to achieve a crusty exterior.
Before transferring the dough, score the top with a lame or sharp knife. This allows for controlled expansion while baking. Once your oven and Dutch oven are hot, carefully place the dough inside, cover it, and bake for the first 30 minutes. This will trap the steam, giving your bread that ideal crust.
| Step | Time | Temperature |
|---|---|---|
| Preheat Oven | 30 minutes | 450°F (230°C) |
| Bake Covered | 30 minutes | 450°F (230°C) |
| Bake Uncovered | 10-15 minutes | 450°F (230°C) |
After the covered baking period, uncover the bread and bake for an additional 10-15 minutes for a deep, brown crust. Monitor the internal temperature; it should reach 205-210°F (96-99°C) for ideal doneness. Finally, let it cool on a wire rack for at least 2 hours before slicing.
Monitoring the Baking Process
As you begin the baking process, closely monitoring the bread is essential for achieving that perfect crust and texture.
After the first 30 minutes with the lid on, it’s time to check the dough’s internal temperature using a meat thermometer. Aim for 205°F for doneness. You’ll want to pay attention to both the bread’s browning and aroma during the uncovered baking phase.
Here’s what to keep in mind:
- Browning Assessment: Watch for a deep brown crust. If it’s not quite there, adjust the baking time accordingly.
- Internal Checks: If the bread seems undercooked after the initial baking time, return it to the oven. Keep checking the internal temperature regularly.
- Crust Observation: A well-baked loaf will have a dark, crispy crust. Tap it lightly; it should produce a slightly hollow sound.
- Final Notes: Trust your instincts. The firmness and color of the crust are key indicators of readiness.
Cooling and Storing Tips
How do you guarantee your sourdough pumpernickel bread remains fresh and flavorful after baking?
First, let your bread cool completely on a wire rack for about 2 hours. This step is essential; it helps prevent moisture buildup and keeps that beautiful crust intact.
Once cooled, store the bread in an airtight container or a plastic bag at room temperature. This keeps it fresh for 5 to 7 days, even without preservatives.
If you want to store it longer, slice the bread and freeze it in a freezer-safe bag. Be certain to consume the thawed slices within 1 to 2 days for the best taste.
Avoid refrigerating your bread, as this can lead to staleness and ruin that delightful texture you’ve worked hard to achieve.
When you’re ready to enjoy your frozen slices, simply toast them directly from the freezer. This method guarantees they come out warm and crispy, a perfect way to relish your homemade sourdough pumpernickel.
Serving Suggestions and Pairings
After allowing your sourdough pumpernickel bread to cool and storing it properly, it’s time to explore how to enjoy it to the fullest.
This hearty bread boasts a robust flavor that complements a variety of dishes and toppings. Here are some serving suggestions to elevate your experience:
- Cream Cheese and Smoked Salmon: Spread a generous layer of cream cheese on your pumpernickel, topped with smoked salmon. The creaminess and richness enhance the bread’s texture beautifully.
- Scandinavian Herring: Pair your slices with herring for a traditional touch. The dense crumb serves as a perfect counterbalance to the fish’s flavors, creating a harmonious bite.
- Reuben Sandwich: Craft a delicious Reuben by layering corned beef, sauerkraut, and Swiss cheese between two slices. The bread’s strong flavor holds up well against the hearty fillings.
- Toasted with Havarti: For a simple snack, toast slices and melt Havarti cheese on top. Add a pat of butter, and you’ll have a savory treat that showcases the bread’s unique qualities.
Frequently Asked Questions
Can I Use All-Purpose Flour Instead of Dark Rye Flour?
You can use all-purpose flour instead of dark rye flour, but your bread won’t have the same rich flavor, color, or density. For best results, consider adding crucial wheat gluten to improve texture.
How Do I Know When My Sourdough Starter Is Active?
If your starter’s not bubbling like a fizzy soda, it’s probably not ready. Look for a pleasant smell, a domed surface, and perform the float test. If it floats, you’ve got an active starter!
What Is the Ideal Temperature for Fermenting the Dough?
The ideal temperature for fermenting your dough is around 74°F (23°C). This promotes peak yeast activity. Keep an eye on fluctuations, as they can impact fermentation and ultimately the quality of your bread.
How Long Can I Store Leftover Pumpernickel Bread?
You can store leftover pumpernickel bread at room temperature in an airtight container for 5-7 days. For longer storage, slice and freeze it, ensuring it stays fresh for up to three months.
Can I Add Seeds or Nuts to the Dough?
Absolutely, you can weave seeds or nuts into your dough, enriching it like a painter, and adding vibrant strokes. Just remember to soak them for better integration and maintain a balanced ratio for harmonious flavor.
The Rustic Charm of Fresh Sourdough Bread
As you savor your freshly baked sourdough pumpernickel bread, let its rich, earthy flavors embrace your senses like a warm hug on a chilly day. You’ve journeyed through each meticulous step, from dough preparation to the final bake, crafting a loaf that’s not just bread but a heartfelt creation.
Remember to enjoy it fresh, perhaps with a slather of butter or a slice of cheese, allowing each bite to transport you to a cozy, rustic kitchen.