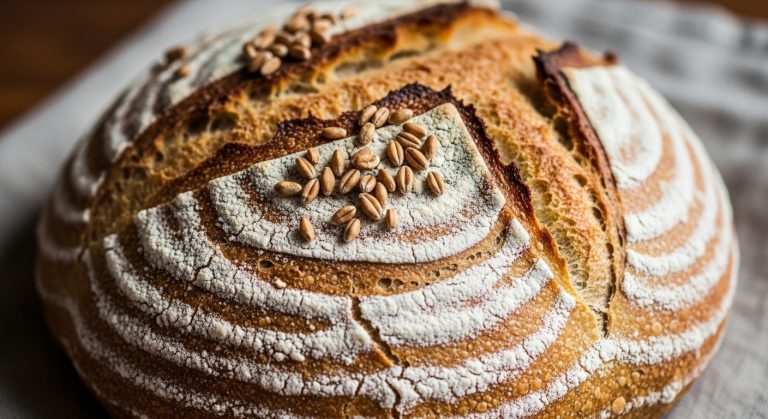
Cinnamon Raisin Sourdough Bread Recipe: Easy and Perfectly Fluffy
You’ll combine about 480-500g high-protein bread flour, 350-375g lukewarm water, 25-100g active sourdough starter, 10-12g salt, 50-65g brown sugar, 5-8g cinnamon, and 75-125g soaked raisins.
After mixing and resting the dough, incorporate cinnamon-sugar swirl, then shape and cold-proof it for 8-72 hours.
Bake at 450°F covered, then uncovered until done. Proper cooling guarantees an open crumb and crisp crust.
Keep going to uncover expert shaping and baking nuances.
Key Takeaways
- Use high-protein bread flour and a mature sourdough starter for strong gluten and good fermentation in cinnamon raisin sourdough bread.
- Soak raisins in warm water for 30 minutes to 2 hours, then incorporate them during stretch-and-fold stages for even distribution.
- Prepare a cinnamon-sugar mixture and spread it on rolled dough before rolling tightly to create a flavorful cinnamon swirl.
- Proof dough in a floured banneton for 8-24 hours at 38-42°F or 1-2 hours at room temperature to develop flavor and texture.
- Bake in a preheated Dutch oven at 450°F covered, then uncovered until internal temperature reaches 200-210°F, and cool fully before slicing.
Complete Cinnamon Raisin Sourdough Bread Recipe
| Ingredient | Weight (grams) | Volume | Notes |
|---|---|---|---|
| High-protein bread flour | 480-500g | ~4 cups | 12.5% protein for strong gluten |
| Lukewarm water | 350-375g | ~1½ cups | 80°F (27°C) for optimal fermentation |
| Active sourdough starter | 25-100g | ~¼-½ cup | Bubbly and doubled in size |
| Fine sea salt | 10-12g | ~2 tsp | Regulates yeast activity |
| Brown sugar | 50-65g | ~¼ cup | Adds sweetness and moisture |
| Ground cinnamon | 5-8g | ~1-2 tbsp | Fresh spice for best flavor |
| Raisins | 75-125g | ~½-¾ cup | Soaked 30 minutes before use |
| Optional walnuts | 50g | ~½ cup | Chopped for added texture |
Ingredients and Measurements
To bake sourdough bread with ideal texture and flavor, you’ll need carefully measured ingredients, starting with flour. Use 480-500 grams of bread flour with about 12.5% protein for strong gluten development.
For perfect sourdough texture and flavor, begin with 480-500 grams of high-protein bread flour.
You may include 35-100 grams of whole wheat or white whole wheat flour to enhance flavor and texture complexity. Rye flour can partially substitute bread flour but isn’t essential.
Water typically ranges from 350 to 375 grams, preferably lukewarm at around 80°F (27°C), to optimize fermentation. Reserve a small portion of water (e.g., 25 grams) for later dough adjustment.
Add 10-12 grams of fine sea salt to regulate yeast activity.
Incorporate 50-65 grams brown sugar and 5-8 grams cinnamon for sweetness and spice.
Raisins (75-125 grams) and optional walnuts (about 50 grams) add texture.
Use 25-100 grams active sourdough starter for leavening.
Using high-quality ingredients and maintaining proper water content are crucial for optimal yeast activity and achieving the desired texture and rising in your bread.
Preparing the Sourdough Starter
Although it requires careful attention, preparing your sourdough starter correctly sets the foundation for successful fermentation.
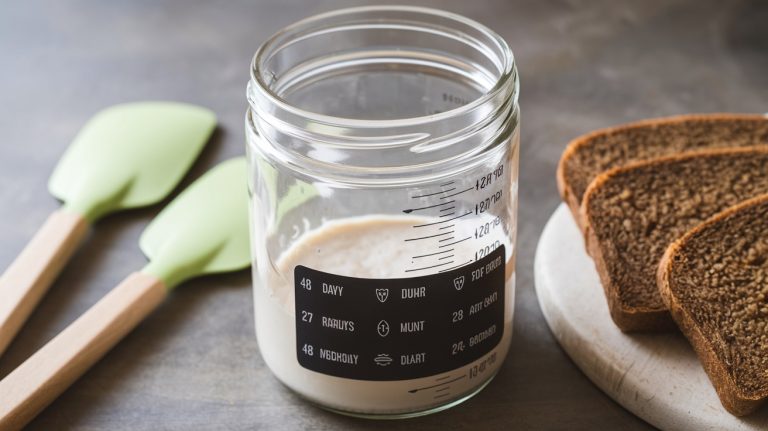
Begin by feeding your active starter with equal weights of flour and water: typically 25g starter, 50g flour, and 50g water, maintaining 100% hydration for consistent microbial activity.
Use water at 75-80°F (24-27°C) to optimize yeast performance. Mix starter with water before adding flour to build levain.
Feed the starter 8-12 hours before use, allowing it to become bubbly, double in size, and emit a tangy aroma.
Confirm peak activity with the float test.
Store your starter properly, feeding regularly to manage acidity and vigor.
Precise measurements, clean containers, and timing ensure your starter supports the desired rise and flavor, vital before incorporating cinnamon and raisins later.
For example, combining the starter with organic bread flour and whole wheat flour creates a robust dough base that benefits the fermentation process ingredients and initial preparation.
Mixing the Dough
When it comes to mixing your dough, getting your measurements right is super important. It helps ensure that your dough stays hydrated and ferments consistently. So, how do you do that? Using a precision baking scale can help you measure ingredients accurately every time.
Well, using techniques like folding by hand or mixing it on a low speed can really make a difference.
These methods are great because they allow you to integrate all your ingredients evenly. Plus, they keep you from overworking the dough, which is key.
You want to develop that gluten structure, but you also want to maintain the extensibility that gives sourdough its signature texture. Using a Dutch dough whisk for mixing helps combine ingredients efficiently without overworking the dough.
Ingredient Measurements Accuracy
Accurate ingredient measurements play a critical role in mixing sourdough dough, as weighing ingredients guarantees consistent hydration and texture.
Using a digital kitchen scale ensures precision far beyond volume measures, especially for flour, whose density varies.
You’ll avoid common errors like miscounting cups or uneven leveling, which disrupt hydration ratios important to dough performance.
Scales simplify scaling recipes and enable sequential ingredient addition with tare functions, reducing cleanup.
Despite precise weights, factors like flour batch and humidity affect dough behavior, so you may adjust water slightly by feel to achieve the ideal medium-consistency dough. This adjustment is particularly important when working with freshly ground flour, which retains oils and nutrients that influence dough hydration.
It is also important to double-check measurements such as salt, since errors can significantly affect bread flavor and texture.
Weighing dough portions also ensures uniform loaf sizes for even baking and crumb structure.
Prioritize weight-based measurements to maintain repeatability and control throughout your cinnamon raisin sourdough bread preparation.
Mixing Techniques Explained
Precise ingredient measurements set the foundation, but how you mix the dough directly influences gluten development and final texture.
Start by hydrating your sourdough starter with water at 80°F (27°C) for ideal activity. Combine starter, water, and salt thoroughly to ensure even salt distribution. Using an active sourdough starter is essential for achieving the best rise and flavor.
Gradually incorporate bread flour until a rough, shaggy dough forms. Use a spatula or damp hands to fold the dough gently to encourage gluten formation without overworking it.
After mixing, let the dough rest for 20-40 minutes at about 70°F (21°C) to hydrate flour and relax gluten, enhancing extensibility. This initial rest period also allows the raisins to soften, making them easier to incorporate evenly.
Incorporate soaked raisins and cinnamon-sugar mixtures carefully post-autolyse with gentle folding to preserve dough strength.
Employ stretch-and-folds during bulk fermentation to build elasticity and gas retention, ensuring even ingredient distribution and superior crumb structure. Allowing the dough to rest also improves flavor and texture by promoting enzymatic activity.
Incorporating Cinnamon and Sugar Swirl
When incorporating a cinnamon and sugar swirl into sourdough bread, preparing a well-balanced mixture is essential for flavor and structural integrity.
Combine 1/4 to 1/2 cup granulated sugar with 1 to 2 tablespoons ground cinnamon, optionally adding flour to absorb moisture and reduce leakage. Using the right flour type can help maintain dough consistency during the swirl application.
Before applying, brush the rolled-out dough rectangle with butter or egg white to enhance adhesion. Using egg whites helps moisten the dough surface for better sugar adherence and reduces gaps.
Sprinkle the cinnamon-sugar evenly, leaving a border, then roll tightly from the short end and seal edges by pinching to maintain swirl integrity.
During proofing, cover the shaped loaf loosely to prevent drying and allow expansion without disturbing the swirl.
Use moderate oven temperatures (around 350°F/177°C) to avoid burning the sugar.
Consider covering the loaf with foil if it browns too quickly.
Adding and Preparing Raisins

Adding raisins to your sourdough introduces a natural sweetness and texture that complements the cinnamon-sugar swirl. Select high-quality, fresh, and pliable raisins; Thompson seedless or organic unsulfured varieties work best to avoid tough, dry spots.
Soak them in warm water for 30 minutes to 2 hours, optionally adding vanilla or mild alcohol to enhance flavor. This soaking step requires hydration adjustments in the dough to maintain proper consistency and gluten structure hydration adjustments.
After soaking, drain and gently pat dry to prevent excess moisture, which could sog the dough. Incorporate raisins during the stretch and fold stage of bulk fermentation, folding them in gently over multiple sessions to maintain dough structure and even distribution.
Adjust dough hydration if using a larger raisin quantity, as raisins compete for water and add natural sugars, which slightly accelerate fermentation. Proper preparation ensures a soft crumb with juicy, sweet pockets without compromising dough consistency. Using a sourdough starter with wild yeast and bacteria can further enhance the complexity and depth of flavor in your cinnamon raisin bread.
Bulk Fermentation Process
Although bulk fermentation timing can vary, maintaining a temperature between 78°F and 80°F (25-27°C) typically allows your cinnamon raisin sourdough dough to develop ideally over 4 to 5 hours. Ensuring proper ventilation and freshness preservation during this phase can significantly enhance dough quality.
Cinnamon slows fermentation, so expect to extend bulk fermentation by 30 to 60 minutes.
Perform 3 to 6 stretch and fold sets at 30-minute intervals to build gluten strength.
Incorporate raisins and cinnamon by laminating after initial folds, ensuring even distribution without deflating the dough.
Most raisins benefit from soaking in boiling water for 20-25 minutes before incorporation to improve hydration and texture raisin hydration.
Aim for a 30-50% volume increase before moving forward.
Maintain a warm, draft-free environment for consistent fermentation.
Use wet hands to prevent dough sticking during folds.
Rest dough 30 minutes between folds for gluten relaxation.
Monitor dough texture: smooth, elastic, slightly tacky.
Avoid overexpansion; dough should hold shape with slight spread.
Shaping and Final Proofing
When you’re shaping your sourdough, it’s all about being gentle. Start by stretching the dough into a rectangle, but be careful not to overstretch it! You want to evenly distribute that delicious cinnamon raisin filling while keeping the dough’s structure intact. Dimpling the dough surface can help enhance flavor and texture, a technique often used in focaccia making.
As you roll it up, make sure to apply some tension; this helps create the surface tension that’s crucial for a good oven spring. Using the pinch and stretch method or coil folds can help strengthen the gluten while shaping.
Now, let’s talk about final proofing. This part is super important, so keep an eye on those proofing times. If you opt for cold proofing, you can enhance the flavor over a period of 12 to 36 hours.
On the flip side, if you’re going for room temperature proofing, you’ll need to be precise with your timing to ensure you don’t end up with over- or underproofed dough. It’s all about finding that perfect fermentation balance.
Dough Shaping Techniques
Mastering dough shaping techniques is essential for developing proper tension and structure, which directly influence your sourdough’s rise and crumb.
Start by pre-shaping with folds that build gluten strength, then gently stretch into rectangles without tearing. Incorporate cinnamon and raisins during stretch-and-folds to ensure even distribution without compromising texture.
It is important to gently release dough from the sides of the bowl with wet fingers to avoid rupturing air bubbles during transfer. Using cold proofing methods like placing dough into the fridge helps enhance flavor and texture development over time.
Create surface tension by rolling and tucking edges firmly, using minimal flour to avoid a tough crust.
Finally, place the shaped dough into lightly floured bannetons for cold proofing, covering to retain moisture and scoring before baking. Cold proofing in the fridge for 8-72 hours allows flavor development and flexible baking timing.
- Fold dough over two-thirds, then opposite side to pre-shape.
- Sprinkle cinnamon-raisin mix during stretch-and-folds.
- Roll and tuck to build tension, smooth surface.
- Lightly flour bannetons to prevent sticking.
- Cover dough during final proof to maintain hydration.
Proofing Time Guidelines
After shaping your dough and placing it in the banneton for final proofing, regulating proofing time and temperature becomes key to achieving the desired rise, crumb structure, and flavor complexity.
Typically, final proofing occurs in the refrigerator at 38-42°F (3-6°C) for 8 to 24 hours, extending up to 36 hours without overproofing. Storing the dough at these temperatures helps maintain the correct hydration level and prevents the dough from drying out. Using a glass or ceramic container during this stage can help maintain the ideal environment by avoiding contamination and allowing gas to escape.
For same-day baking, proof at room temperature around 78°F (25.5°C) for 1 to 2 hours until the dough rises 30-50%.
Maintain dough hydration by covering it with plastic wrap or a shower cap during cold proof.
Keep in mind cinnamon slows fermentation, so adjust bulk and final proof times accordingly.
Monitoring dough visually ensures you avoid under- or overproofing, which can compromise oven spring and flavor balance.
Baking Instructions and Tips
Although sourdough baking demands patience and attention, controlling your oven environment and timing guarantees ideal crust formation and crumb structure.
Start by preheating your oven and Dutch oven to 450-500°F (232-260°C) for at least 30 minutes.
Score the dough just before baking to guide expansion.
Bake covered for 15-20 minutes to trap steam, then uncover and reduce temperature to 400-450°F (204-232°C) to develop a deep crust.
Finish baking until internal temperature hits 200-210°F (93-99°C).
Use a digital scale for accuracy in ingredients.
Monitor dough rise rather than time due to cinnamon’s fermentation impact.
Soak raisins well to maintain dough moisture.
Avoid over-fermentation to preserve loaf volume.
Baking in a covered vessel replicates steam oven conditions for artisan crust.
Cooling and Slicing the Bread
After you’ve baked your sourdough, the first thing you’ll want to do is let it cool on a wire rack. It’s best to give it at least an hour to set the crumb and keep that crust nice and crispy. Trust me, waiting is worth it!
Now, I know the temptation to slice into that warm loaf is strong, but try to resist. If you cut too soon, you’re going to end up with a gummy texture and some messy tearing. Nobody wants that!
When you’re finally ready to slice, grab a serrated bread knife. Use gentle sawing motions to ensure you get clean, even slices without squishing the loaf. Enjoy your perfectly sliced sourdough!
Proper Cooling Techniques
When you remove sourdough bread from the oven, allowing it to cool properly is essential to preserving its texture and moisture. Cooling lets residual steam escape gradually, preventing dryness and staling.
Use a wire rack at room temperature (20-22°C) to promote air circulation and avoid sogginess or crust softening. Cooling below one hour compromises crumb setting and moisture redistribution, while excessive warmth risks mold. It is important to monitor dough closely for signs of overfermentation or underfermentation, especially in warm conditions, to understand how cooling impacts the bread’s final quality.
Follow these key points to ensure ideal cooling:
Elevate the loaf on a wire rack to expose all sides to air.
Avoid enclosed containers or refrigeration during cooling.
Rotate the loaf periodically for even temperature distribution.
Do not cover or stack the bread to maintain crust crispness.
Allow at least one hour of cooling before slicing to retain freshness.
Best Slicing Practices
Properly cooled sourdough bread sets the crumb and preserves moisture, creating the ideal conditions for slicing. Always wait at least one hour, preferably up to two, for the bread to cool completely on a wire rack. This stabilizes the crumb and prevents gummy texture. Cooling the bread fully before slicing is essential to lock in moisture and prevent dryness or gumminess.
Use a sharp, serrated bread knife with an 8-10 inch blade, ensuring clean cuts without crushing the loaf. Employ a gentle back-and-forth sawing motion with minimal force, holding the bread steady on a non-slip surface.
Slice at a slight downward angle for uniform thickness and rotate the loaf as needed.
Adjust slice thickness based on use; thicker for toasting, thinner for sandwiches. After slicing, store bread loosely wrapped to maintain crust crispness and avoid moisture buildup.
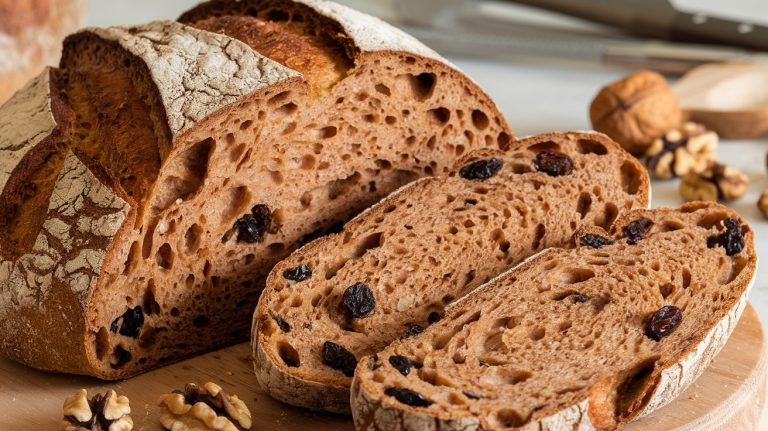
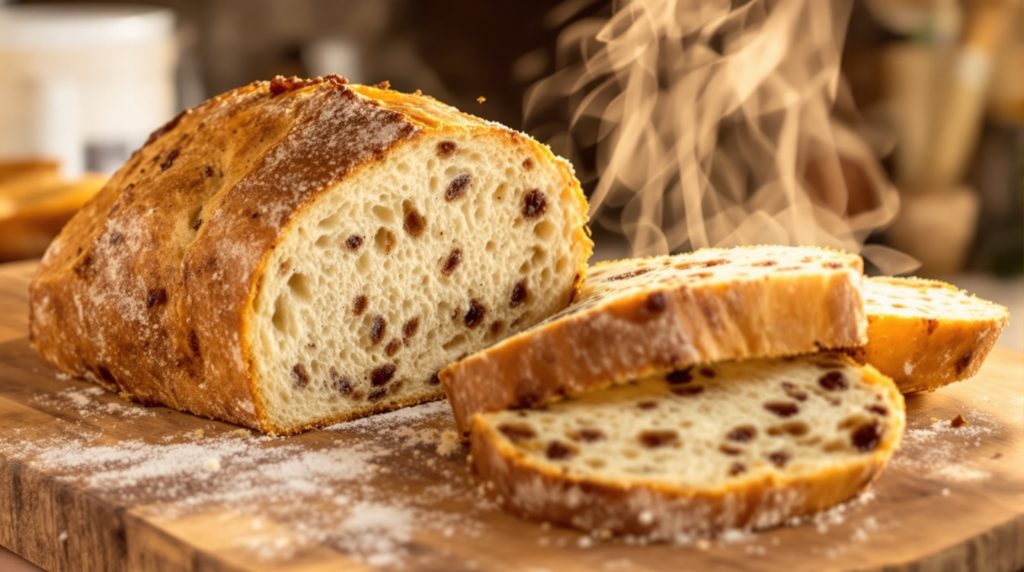
Flavor Profile and Texture Highlights
Although sourdough fermentation introduces a mild tangy undertone, the flavor profile of cinnamon raisin sourdough bread primarily balances warm, aromatic cinnamon with juicy, sweet raisins. This creates a complex sweet-spiced character that’s enhanced by the cinnamon sugar swirl, intensifying the cinnamon presence throughout the loaf.
The texture contrasts a crusty, firm exterior with a soft, moist, and chewy crumb, enabled by high hydration and gluten development. Raisins swell during fermentation, adding moist pockets while the swirl introduces slight stickiness, enriching mouthfeel. The use of high hydration at 81% supports this tender crumb and open structure.
- Warm cinnamon aroma complements natural raisin sweetness
- Mild sourdough tang balances overall sweetness
- Crust offers firm, crunchy contrast to tender crumb
- Open, airy structure results from ideal hydration
- Moist, chewy texture supported by gluten and fruit inclusion
Frequently Asked Questions
Can I Substitute Dried Cranberries for Raisins in This Recipe?
Yes, you can substitute dried cranberries for raisins without affecting dough rise or baking time. Expect a tarter, tangier flavor with slightly firmer texture.
If using sweetened cranberries, balance sweetness accordingly. Soaking cranberries is optional but can enhance moisture and flavor; just avoid adding excess water.
Chopping cranberries helps distribute flavor evenly but isn’t necessary. Adjust complementary spices or honey to harmonize the bread’s taste when swapping these fruits.
How Do I Store Leftover Cinnamon Raisin Sourdough Bread?
Treat your leftover bread like a treasure. Store it airtight at room temperature to keep freshness for 2-5 days.
Avoid heat and humidity to prevent mold. If you want longer life, wrap it tightly and refrigerate for up to 9 days, but expect slight staling.
For months-long storage, freeze whole or halved loaves wrapped in plastic and freezer bags. Thaw naturally or toast slices straight from frozen to revive texture perfectly.
Is It Possible to Make This Bread Without a Banneton?
Yes, you can make your cinnamon raisin sourdough without a banneton.
Shape the dough into a tight ball and proof it seam side up in a bowl lined with a well-floured kitchen towel to prevent sticking.
Just make certain careful dough handling to maintain tension.
Baking in a Dutch oven helps develop crust and oven spring, compensating for the lack of banneton support and ensuring excellent bread texture and flavor.
Can I Freeze the Dough Before Baking?
You can freeze the dough before baking, but timing is key. Think of it as catching the dough mid-dance, after bulk fermentation but before final shaping.
Freeze it then, wrapped airtight to prevent freezer burn. Thaw it slowly in the fridge, then proof again to regain its rise.
This method preserves texture and flavor, though expect slight baking time adjustments. Avoid freezing too early, or your bread’s structure and rise might falter.
What Is the Best Way to Reheat Sliced Sourdough Bread?
The best way to reheat sliced sourdough bread is to use a toaster or toaster oven on a low setting for 6-8 minutes, especially if slices are frozen.
Alternatively, an air fryer at 350-400℉ for 2-5 minutes crisps and warms slices efficiently.
Lightly brush slices with water or oil before reheating to maintain moisture and improve crust texture.
Avoid microwaving, as it makes sourdough rubbery and soggy.
Amazing Sourdough Creation in No Time
Now that you’ve mastered crafting this cinnamon raisin sourdough, you’re equipped to impress even a Victorian baker with your modern technique.
By carefully controlling fermentation, incorporating a precise cinnamon-sugar swirl, and evenly distributing plump raisins, you guarantee consistent texture and flavor.
Remember to cool the loaf fully before slicing to preserve crumb structure.
With these technical steps, you’ll consistently produce bread that balances tangy sourdough complexity with sweet, aromatic warmth every time.