Window Pane Test for Sourdough: Stretching Success
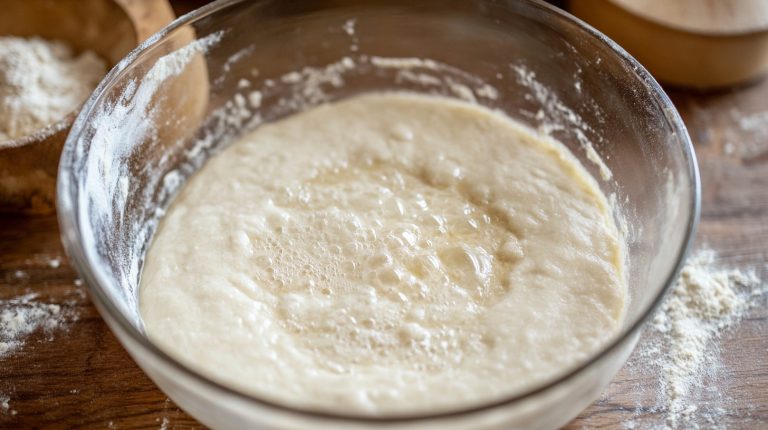
The windowpane test is essential for evaluating gluten development in your sourdough. To perform it, take a golf ball-sized piece of dough and stretch it gently.
If it forms a translucent membrane without tearing, your gluten is strong, indicating excellent kneading and fermentation. This guarantees your bread will rise beautifully, trapping those precious gases.
Remember, gluten strength can vary based on flour type and hydration levels. If it tears, your dough needs more kneading. Understanding these nuances can elevate your baking game considerably, revealing techniques and tips that will transform your sourdough journey.
Key Takeaways
- The windowpane test assesses gluten development, indicating if the sourdough has been kneaded properly to trap gases during fermentation.
- To perform the test, stretch a small piece of dough; a thin, translucent membrane shows sufficient gluten strength.
- A successful windowpane indicates good fermentation and kneading, while tearing suggests more kneading is needed for improved elasticity.
- Whole grain flours may yield different results due to bran interfering with gluten formation, affecting the test outcome.
- Consistent hydration around 66% enhances gluten structure, making it vital for successful sourdough baking and passing the windowpane test.
Importance of the Windowpane Test
The windowpane test is an essential tool in a baker’s arsenal, serving as a clear indicator of gluten development in your sourdough.
When you stretch a small piece of dough, the ability to form a thin, translucent membrane reveals the strength of the gluten structure. This strength is vital for trapping gases during fermentation, leading to a better rise and texture in your final loaf.
By mastering the windowpane test, you can assess if your sourdough starter has been properly mixed and fermented.
Remember, whole grain flours might yield different results due to bran inhibiting gluten development, so adjust your expectations accordingly.
This visual guideline is invaluable, especially for beginners aiming for consistent, delightful sourdough creations.
How to Perform the Test
Starting with a piece of dough about the size of a golf ball, you’ll want to flatten it slightly and let it rest for about five minutes.
This resting period relaxes the gluten, making it easier to stretch.
Now, gently stretch the dough from opposite ends. Aim to create a thin, translucent membrane that lets light shine through without tearing.
This is the essence of the windowpane test. If you succeed, it means your dough has been kneaded sufficiently, showcasing excellent gluten development essential for your sourdough’s structure.
However, if the dough tears easily, it needs more kneading to improve gluten strength and elasticity.
How Gluten Develops
Gluten structure is the backbone of your sourdough, allowing it to capture the gases that turn simple ingredients into a beautifully risen loaf.
Understanding the factors affecting gluten strength, like fermentation time and the presence of wild yeast, is essential for mastering your dough’s texture. Factors such as temperature management during fermentation also play a considerable role in gluten development.
Gluten Structure Importance
A robust gluten structure is essential for crafting high-quality sourdough, as it forms the backbone of your dough, providing both strength and elasticity. This network of proteins traps gases during fermentation, allowing your bread to rise beautifully.
To achieve a strong gluten structure, you need to develop glutenin and gliadin proteins through techniques like kneading or stretch and fold. Additionally, monitoring your dough’s rise and maintaining a consistent dough temperature of around 75°F (24°C) will contribute to effective gluten development, as discussed in dough mixing techniques.
Proper hydration, ideally around 66%, also plays a key role in enhancing gluten formation. When using whole wheat flour, keep an eye on your dough; the bran can hinder gluten development.
Performing the windowpane test will help you assess the gluten structure, ensuring your final loaf boasts an airy crumb and impressive volume.
Factors Affecting Gluten Strength
While many factors influence the strength of gluten in your dough, the quality of flour you choose stands out as an essential determinant. Higher protein content, like that found in bread flour, enhances gluten strength, allowing for a robust network that supports your sourdough.
Additionally, maintaining a healthy sourdough starter is important, as a strong starter contributes to the dough’s overall structure and rise, as noted in signs of a healthy starter.
Pay attention to hydration levels, too; fully hydrated dough enables glutenin and gliadin proteins to align properly, creating that desirable elasticity.
However, additives like fats, seeds, or nuts can inhibit gluten formation, weakening your dough structure. Be cautious with kneading as well—over-kneading can toughen the dough, hampering its rise.
Techniques for Enhancing Gluten
Building on the factors that influence gluten strength, there are several effective techniques you can employ to enhance gluten development in your sourdough.
Start by using high-protein bread flour, containing about 12.7% protein, which forms the backbone of strong gluten. Engaging in stretch-and-fold during bulk fermentation helps gradually build gluten without heavy kneading, allowing flavors to develop beautifully.
Additionally, consider incorporating methods like using a preheated Dutch oven for baking, which can also improve the overall texture of your bread. Keep hydration around 66% to facilitate the interaction of glutenin and gliadin proteins, creating a robust gluten network.
Adding a splash of acid, like vinegar or sourdough starter, strengthens protein bonds for better elasticity. Finally, opt for longer fermentation times with periodic folds instead of continuous kneading to achieve an exquisite texture, ultimately passing the windowpane test with flying colors.
Challenges With Sourdough Dough
Many bakers face significant challenges when working with sourdough dough, particularly when it comes to achieving the elusive windowpane test. The unique fermentation process and wild yeast can hinder gluten development, leaving your dough soft and unstructured. Even an active sourdough starter may not guarantee success, especially if you’re shifting from commercially yeasted dough. To navigate these hurdles effectively, understanding the quality and activity level of your starter is essential. Engaging with the baking community can also reveal valuable insights and solutions to improve gluten formation.
| Challenge | Solution |
|---|---|
| Soft, unstructured dough | Assess starter activity |
| Poor gluten development | Experiment with kneading techniques |
| Different behavior than yeast | Adjust hydration levels |
| Inconsistent windowpane test | Share experiences with others |
| Unpredictable results | Practice and patience |
Tips for Successful Kneading
Kneading sourdough effectively is essential for developing a strong gluten structure, which ultimately determines the texture of your bread. Start with a higher hydration dough at around 66% to promote elasticity.
Using a durable glass container can enhance your kneading process by providing a stable surface and visibility into your dough’s progress. Use the stretch-and-fold method during bulk fermentation, enhancing dough strength without excessive kneading.
As you knead, monitor the dough’s texture; it should transform into a smooth, elastic consistency, signaling proper gluten formation. If your dough feels sticky and won’t come together, keep kneading until it’s cohesive and pliable.
Incorporate periodic resting intervals to allow gluten strands to relax, making it easier to achieve the desired consistency. Finally, use the windowpane test to check if your dough has developed enough strength before shaping.
Alternative Perspectives on the Test
While the windowpane test serves as a valuable tool for gauging gluten development, it’s not the only method to assess your sourdough’s readiness. Many bakers advocate for a broader view, emphasizing dough quality over strict adherence to the windowpane criteria.
You might find that a smooth, elastic dough can still yield excellent results, even if it doesn’t pass this test. Instead, focus on how well your dough shapes and holds form; this can be more indicative of its readiness.
Personal experience plays a significant role here, shaping your intuition and leading to varied baking philosophies. Ultimately, trust your gut and prioritize the overall quality of your dough—after all, baking is as much an art as it’s a science.
Experimental Techniques for Sourdough
Experimenting with sourdough techniques opens up a world of possibilities to refine your baking skills and deepen your understanding of gluten development.
Start by conducting side-by-side tests with both sourdough and commercially yeasted dough, ensuring consistent hydration around 66%.
During bulk fermentation, incorporate the Stretch and Fold (S&F) method to enhance your dough’s structure—watch as the crumb transforms!
Monitor the dough’s elasticity and texture after each fold, adjusting timing based on its rise.
To elevate gluten formation, consider using higher protein flour or adding essential wheat gluten.
Document your visual results throughout this process; it’ll provide invaluable insights into how different leavening agents and techniques influence gluten development, culminating in the ultimate windowpane test.
Common Baking Questions
When you’re diving into the world of sourdough baking, it’s natural to have questions that can influence your success. One common concern is why your dough sometimes fails the windowpane test. This often indicates insufficient gluten development, even with an active starter.
To achieve ideal dough structure and elasticity, aim for a hydration level around 66%. Whole grain flours can complicate matters, as bran can hinder gluten formation necessary for passing the windowpane test.
You might also worry about over-kneading, which can toughen your bread and dull its flavor. Finally, troubleshooting sourdough fermentation is essential; monitor dough consistency and rising times, as these factors directly impact your test results and overall baking success.
Recommended Resources for Bakers
To truly master the windowpane test, you’ll want to arm yourself with essential baking books that break down the intricacies of gluten development and kneading techniques.
Online video tutorials can visually guide you through the process, ensuring you grasp each step with confidence.
Plus, engaging in community baking forums allows you to share insights and experiences, enriching your understanding of this vital skill.
Essential Baking Books
A solid foundation in baking is crucial for mastering sourdough, and essential baking books can serve as invaluable resources for both novice and experienced bakers.
Titles like “Bread: A Baker’s Book of Techniques and Recipes” by Jeffrey Hamelman explore the windowpane test and gluten development, teaching you how to assess your bread dough’s strength.
“Tartine Bread” by Chad Robertson emphasizes fermentation, guiding you to achieve that perfect crust and crumb.
Ken Forkish’s “Flour Water Salt Yeast” explains the science behind artisan bread making, including detailed applications of the windowpane test.
Peter Reinhart’s “The Bread Baker’s Apprentice” offers troubleshooting tips, while Vanessa Kimbell’s “The Sourdough School” investigates dough behavior, ensuring your sourdough journey is both informed and successful.
Frequently Asked Questions
When Should Sourdough Pass the Windowpane Test?
You should aim for your dough to pass the test after it’s fully fermented and shaped. Look for that smooth, elastic texture, where it stretches thinly without tearing—an exciting sign of well-developed gluten.
What Happens if Dough Doesn’t Pass Windowpane Test?
If your dough doesn’t pass the test, it’s like a dream deferred—dense and unyielding. You’ll need to knead more, adjust hydration, or select a stronger flour to release its potential for a beautiful rise.
How Long to Knead Dough for Window Pane Test?
Knead your dough for about 8 to 12 minutes, feeling it transform from a lumpy mass into a smooth, elastic texture. Pay attention; if it breaks, keep working until it’s ready to shine.
What Is the Windowpane Test in Bulk Fermentation?
Did you know that properly developed gluten can increase your bread’s rise by up to 30%? The windowpane test shows if your dough’s elasticity is ready, allowing light to pass through without tearing. It’s essential!
Stretch, Shine and Savor: Mastering the Windowpane Test
Mastering the windowpane test can transform your sourdough from a mere loaf into a heavenly creation that sings with flavor and texture. Understanding gluten development and honing your kneading techniques will reveal the secrets to that perfect stretch and shine.
Remember, every baker’s journey is unique, and experimentation is key. So, embrace the challenges and let your passion for baking soar because with practice, your sourdough will rise to legendary heights.