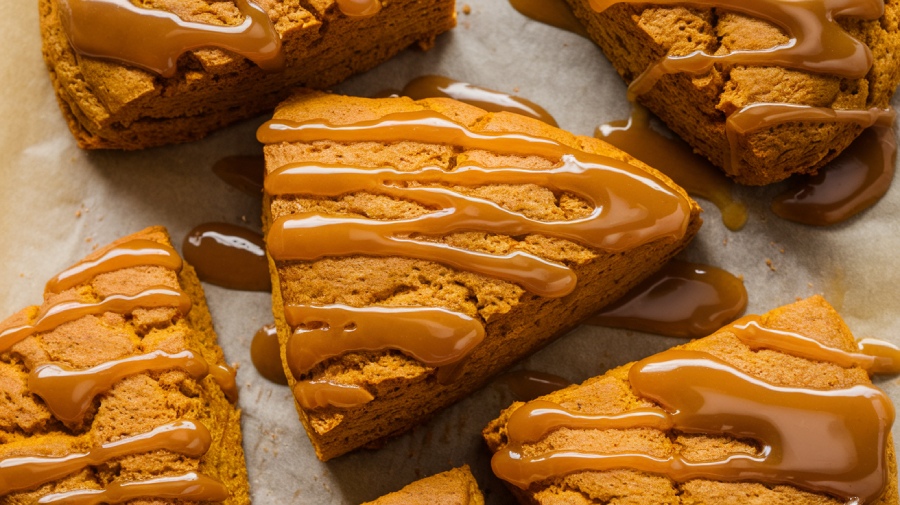
Sourdough Pumpkin Scones: Sweet, Spiced and Delicious
Sourdough pumpkin scones combine the tangy flavor of sourdough with the rich warmth of pumpkin, creating a delightful treat for your autumn mornings. You’ll fold sourdough discard and pumpkin puree into a buttery, flaky dough before shaping it into enticing triangles or circles.
After a quick chill, bake them until golden and serve warm. Add chocolate chips or spices for a twist! Stick around to uncover storage tips and perfect pairings that’ll elevate your scone experience.
Key Takeaways
- Combine all-purpose flour, sourdough discard, and pumpkin puree for a flavorful base in scones.
- Use cold butter and avoid overmixing to achieve a flaky texture.
- Chill shaped dough before baking for optimal rise and golden crust.
- Experiment with spices, chocolate chips, or nuts for unique flavor variations.
- Serve warm or at room temperature, optionally drizzled with sweet glaze.
Ingredients Needed
When you set out to make Sourdough Pumpkin Scones, gathering the right ingredients is essential for achieving that perfect blend of flavors and textures.
Start with all-purpose flour for structure, typically around 240-370 grams. Don’t forget the sourdough discard, adding tang and texture—aim for 100-130 grams. Canned pumpkin puree brings moisture and rich flavor, so include 100-150 grams. Utilizing filtered water at optimal temperatures can also enhance the dough’s overall quality.
Start with all-purpose flour, sourdough discard, and canned pumpkin puree for a balanced and flavorful scone base.
You’ll need 113 grams of unsalted butter for flakiness and one large egg for binding. For dry ingredients, add 2 ½ to 15 grams of baking powder, ¼ to ½ teaspoon of baking soda, and a teaspoon of salt.
Spice it up with 2 teaspoons of pumpkin pie spice and ground cinnamon. This combination sets the stage for delicious scones! Additionally, using sourdough discard enhances the texture and provides a nice tanginess that balances pumpkin’s sweetness.
Preparation Steps
To craft the perfect sourdough pumpkin scones, you’ll start with some essential ingredient preparation techniques. Mixing the dough requires a careful balance of dry and wet ingredients, ensuring you maintain that tender texture, which is achieved by using all-purpose flour.
A key aspect to consider is the dough kneading capability of your equipment, as it significantly influences the final texture of your scones. Once your mixture comes together, shaping the scones becomes a fun and rewarding step in the process.
Ingredient Preparation Techniques

While preparing the ingredients for your Sourdough Pumpkin Scones, it’s important to focus on techniques that enhance both flavor and texture. Start by using cold, unsalted butter to guarantee that your scones remain flaky. Blot excess liquid from pumpkin puree to avoid a wet dough. Gradually add cream or milk to achieve the right consistency. Remember to keep your sourdough discard chilled and your eggs at room temperature for ideal mixing. Additionally, consider incorporating sourdough starter to give your scones a unique depth of flavor. Using high-protein flour can also contribute to better rise and texture in your scones, making them even more delightful.
| Ingredient | Preparation Technique |
|---|---|
| Butter | Keep cold for flakiness |
| Pumpkin Puree | Blot excess liquid |
| Eggs | Use at room temperature |
These simple steps will elevate your scones, making them a delightful treat!
Mixing and Shaping Methods
After you’ve prepared your ingredients, it’s time to mix and shape the dough for your Sourdough Pumpkin Scones.
Start by whisking together the flour, sugar, baking powder, salt, and spices in a medium bowl. Grate cold butter into the mixture for even distribution, or use a pastry cutter to incorporate it, ensuring a flaky texture. Many bakers find that using high-quality organic ingredients enhances the overall flavor of their baked goods.
In a separate bowl, whisk the sourdough discard, pumpkin puree, cream, egg, and vanilla. The use of sourdough discard in the recipe not only contributes to the flavor but also helps achieve a soft texture with crispy edges.
Gently combine the wet and dry ingredients, being careful not to overmix. Form the dough into a cohesive ball, divide it, and pat each section into a circle.
Add your desired fillings, sandwich them, and cut into scone shapes. Chill briefly before baking for perfect flakiness!
Mixing the Dough
Mixing the dough for your sourdough pumpkin scones is an essential step that sets the stage for their delightful texture and flavor. Start by preparing your dry ingredients, combining flour, sugar, baking powder, spices, and salt. In a separate bowl, mix the wet ingredients: sourdough discard, pumpkin puree, egg, cream, and vanilla. Gently fold the wet into the dry using a fork or spoon, ensuring not to overmix.
Aim for a shaggy, cohesive dough with visible butter pieces. Remember, the use of extra sourdough discard adds a subtle tang to the scones, enhancing their overall taste. A powerful mixer with minimum motor power is essential for effective kneading and achieving the right dough consistency. Here’s a quick reference to guide you:
| Ingredient | Amount |
|---|---|
| All-purpose flour | 2 to 3 cups |
| Brown sugar | 1/2 cup |
| Baking powder | 1 to 2 1/2 tsp |
| Pumpkin puree | 1/2 cup |
| Sourdough discard | 1/2 cup |
Shaping the Scones
Once you’ve mixed your dough, it’s time to shape those scones into delightful forms that will bake up beautifully.
Start by rolling out the dough on a lightly floured surface to prevent sticking. Aim for an even thickness—about 1 inch for circles or ½ to ¾ inch for squares. Using a sharp knife or bench scraper, cut your dough into desired shapes. For that classic scone look, consider cutting triangles or opt for round shapes for a uniform appearance. Remember that this recipe uses baking powder and baking soda for leavening, which helps achieve a light texture. A quality bench scraper enhances baking efficiency, making the cutting process smoother and more precise.
Remember to handle the dough minimally to maintain its flaky layers. After shaping, refrigerate your scones for at least an hour to guarantee they hold their shape during baking.
Baking Instructions
As you prepare to bake your scones, preheating the oven to your chosen temperature is essential for achieving that perfect rise and golden crust. Even heat distribution is crucial for baking quality, which you can achieve by using the right cookware. Line a baking sheet with parchment paper to prevent sticking, and make sure to space the scones evenly. If you’re aiming for a golden finish, brush the tops with an egg wash before baking.
Bake at 400°F for 15-20 minutes, or adjust to 425°F for a quicker 15-minute bake. Keep an eye on them; they’re done when lightly browned or a toothpick comes out clean. To make the most of your baking, you can utilize either active sourdough starter or sourdough discard in this recipe. Once baked, allow the scones to cool on a wire rack for a few minutes, preventing sogginess and letting any glaze set perfectly. Enjoy the delightful aroma!
Flavor Variations
When it comes to flavor variations in your sourdough pumpkin scones, the possibilities are delightful and diverse. You can add a cinnamon sugar filling for a sweet and spicy kick that beautifully complements the pumpkin.
For a more traditional fall flavor, consider mixing in pumpkin spice, with its warm blend of cinnamon, nutmeg, and ginger. If you’re a chocolate lover, throw in some chocolate chips for an indulgent twist. Adding dough enhancers can improve the overall texture and rise of your scones, making them even more enjoyable.
For added crunch, pecans or walnuts work wonders, while cranberries provide a fruity tartness that balances the sweetness. Additionally, incorporating sourdough discard into your recipe not only enhances the flavor but also makes great use of any extra you have on hand.
Finally, drizzling a maple syrup glaze can elevate your scones, giving them a rich, sweet finish that’s perfect for any autumn gathering.
Storage Tips
After you’ve enjoyed experimenting with various flavors in your sourdough pumpkin scones, it’s important to know how to store them properly to maintain their deliciousness. Here are some quick tips to help you keep them fresh:
| Storage Method | Duration |
|---|---|
| Room Temperature | Up to 2 days |
| Refrigeration | Up to 5 days |
| Freezing Unbaked Scones | Up to 3 months |
| Freezing Baked Scones | Up to 2 months |
Make sure your scones cool completely before storage to preserve their texture. Using airtight seals can help maintain moisture and prevent staleness. Use parchment paper between scones to prevent sticking and store glazes separately to avoid sogginess. Sourdough starter discard adds a unique tangy depth to your scones, enhancing their flavor. For best results, reheat in a 300°F oven for 5-10 minutes before serving.
Enjoying Your Scones
There’s nothing quite like savoring your freshly baked sourdough pumpkin scones, especially when they’re still warm from the oven. Pair them with a hot cup of coffee or a spiced tea to elevate your experience. For a special touch, consider drizzling them with a sweet cream cheese glaze or enjoying them alongside savory scrambled eggs. Incorporating high-quality flour options into your baking can further elevate the overall taste and texture of your scones.
Perfect Pairings for Scones
As you savor your freshly baked sourdough pumpkin scones, the right pairings can elevate the experience to a whole new level. Consider complementing your scones with a warm pumpkin spice latte, or indulge in the cozy embrace of chai tea. For toppings, a cream cheese glaze adds delightful sweetness, while crispy bacon provides a savory contrast. Combining multiple scone mixes can create new flavors that enhance your scone experience.
| Type | Pairings | Flavor Profile |
|---|---|---|
| Beverages | Pumpkin Spice Latte | Warm, Spicy |
| Sweet Toppings | Maple Syrup | Rich, Sweet |
| Savory Combinations | Cheddar Cheese | Sharp, Earthy |
These combinations not only enhance the flavors but also create a delightful experience, making your scones even more enjoyable.
Ideal Serving Temperature
What’s the best way to enjoy your freshly baked sourdough pumpkin scones? Ideally, you’ll want to serve them at room temperature or slightly warmed to preserve their flaky texture and delightful flavor.
After baking, let your scones cool for a few minutes on a wire rack—this helps develop their perfect structure. If you’re savoring them a day later, pop them in a preheated oven at 350°F for a few minutes to restore that fresh-baked charm. To enhance the flavor, consider drizzling them with maple brown butter icing for an extra touch of sweetness.
Pair your scones with a rich cream cheese glaze or a hint of pumpkin spice for enhanced flavor. Enjoy them alongside a steaming cup of coffee or tea, and you’ll truly appreciate the seasonal joy of these delicious treats!
Storage Tips for Freshness
To keep your sourdough pumpkin scones fresh and delicious, proper storage is key. For up to two days, you can store them at room temperature in an airtight container. If you want to extend their life, wrap them individually and place them in the refrigerator for up to five days.
For longer storage, freeze your baked scones without glaze for up to three months. You can also freeze unbaked scones after solidifying them on a baking sheet; they bake perfectly from frozen, just add a few minutes to the baking time. Remember to thaw frozen scones at room temperature before enjoying. Proper storage tips guarantee your scones retain their delightful texture and flavor for as long as possible!
Frequently Asked Questions
Can I Substitute Whole Wheat Flour for All-Purpose Flour?
Absolutely, you can substitute whole wheat flour for all-purpose flour, but it’s a bit like choosing a bold red wine over a light white—you’ll get a different experience!
Whole wheat flour absorbs more liquid, so you might need to add a bit more moisture to your recipe.
Remember, it can create a denser texture, but you’ll enjoy that nutty flavor and added fiber.
Just keep an eye on baking times for the best results!
How Do I Know When the Scones Are Done Baking?
You’ll know your scones are done when the edges turn golden brown and the tops are lightly browned as well.
Gently press the tops; they should feel firm, not soft or squishy. A toothpick inserted into the center should come out clean or with just a few crumbs.
Keep an eye on the color—darkening is normal, but avoid over-baking. Trust your senses; those visual and tactile cues are key to perfect scones!
Can I Freeze Unbaked Scones for Later Use?
Absolutely, you can freeze unbaked scones for later use!
Start by arranging them on a parchment-lined sheet pan and freeze until solid, usually 1-2 hours.
Once frozen, transfer them to airtight containers or freezer bags.
This method not only preserves their freshness but also allows you to bake them whenever you crave a warm treat.
What Can I Use Instead of Sourdough Discard?
Isn’t it ironic how something as simple as sourdough discard can lead to so many alternatives?
You’ve got options like buttermilk and yogurt, both offering that tangy kick without the fuss.
Sour cream adds creaminess, while an active starter boosts fermentation.
Want to experiment? Try homemade starter paste for a DIY feel.
Just remember to adjust your liquids and flavors to keep everything balanced.
How Long Will Baked Scones Stay Fresh?
Baked scones typically stay fresh for about 1 to 2 days at room temperature, but storing them properly is key.
Keep them in a cool, dry place and cover them with foil or plastic wrap to lock in moisture.
If you want to extend their shelf life, refrigerate them in an airtight container for up to 3 days.
For even longer storage, consider freezing them, where they can last up to 3 months.
Cozy Comfort in Every Bite
Now that you’ve mastered making sourdough pumpkin scones, each bite will be like a warm hug on a chilly day. Whether you enjoy them fresh out of the oven or with a dollop of cream, these delightful treats are sure to brighten your mornings.
Remember to experiment with flavors and store any extras properly to keep them fresh. So go ahead, savor your scones, and share the joy with friends and family—after all, good food is meant to be shared.