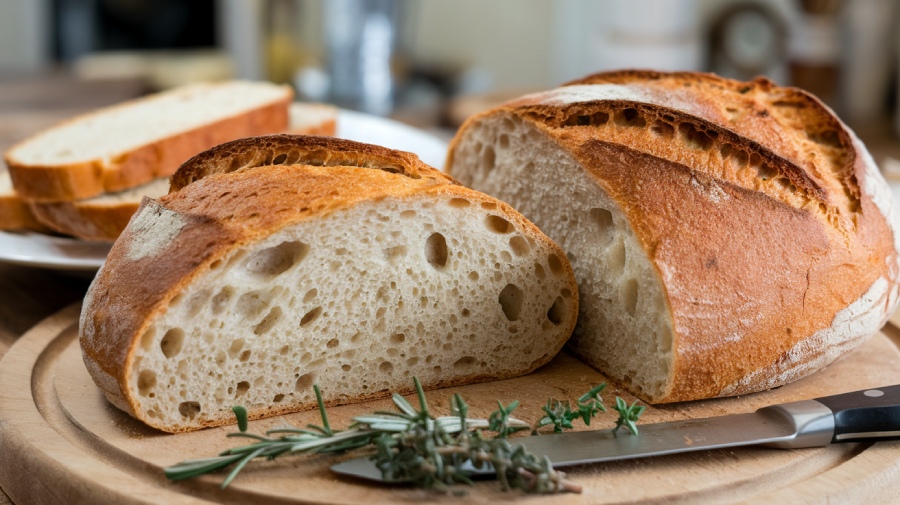
Overproof Vs Underproof Sourdough: The Baker’s Dilemma
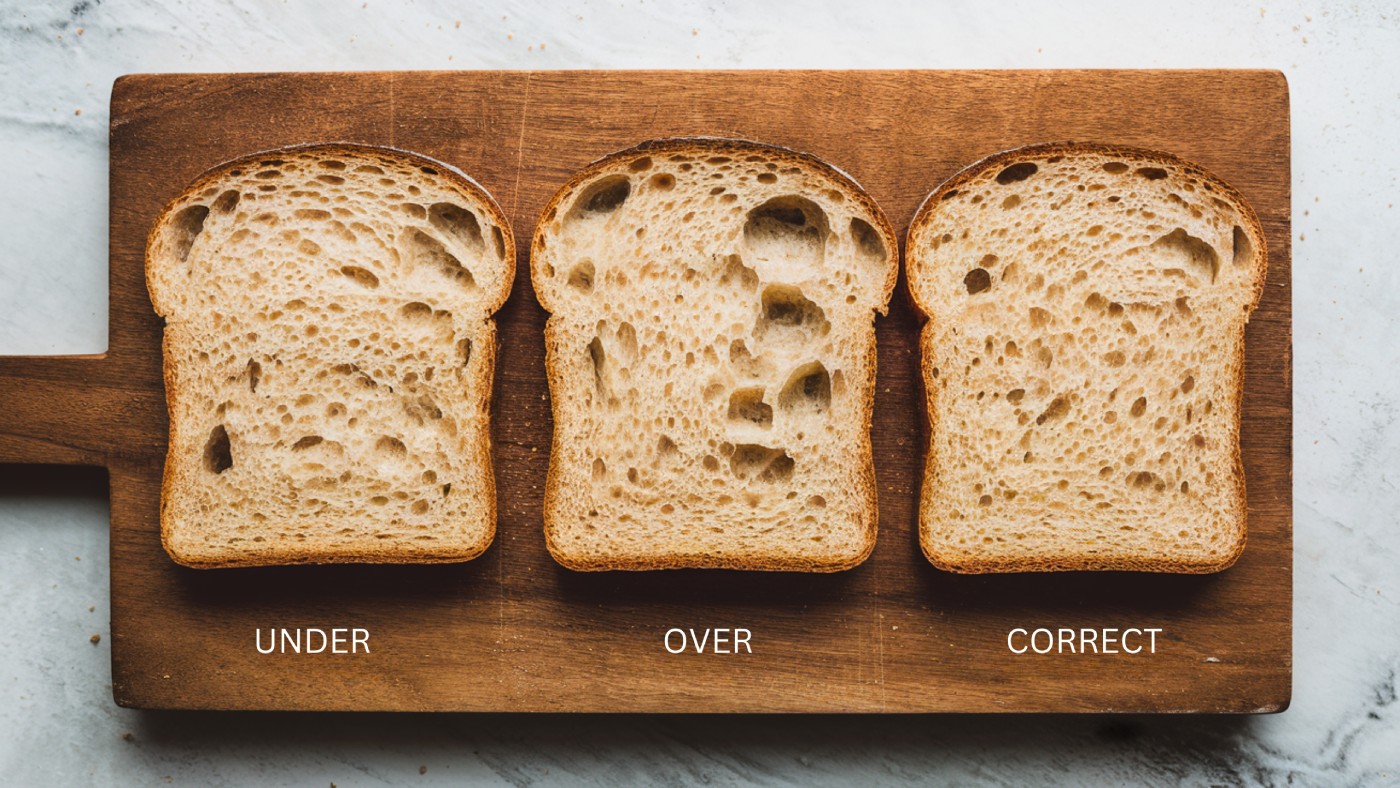
When it comes to sourdough, understanding overproofing and underproofing is key. Overproofed dough appears flat and has a pale crust, often tasting overly acidic.
In contrast, underproofed sourdough is dense, with large holes and a gummy texture. Both conditions stem from fermentation time and temperature management.
You’ll want to avoid these pitfalls to create the perfect loaf that boasts an airy crumb and rich flavor. Keep exploring to uncover more insights on perfecting your sourdough skills.
Key Takeaways
- Overproofed sourdough appears flat with a pale crust and irregular crumb structure, while underproofed sourdough is dense with large holes.
- Overproofing results in a sticky texture and runny dough, whereas underproofing leads to a gummy, dense crumb.
- Overproofed bread has an overwhelming alcoholic taste, while underproofed bread often lacks flavor complexity and depth.
- High hydration levels can increase the risk of overproofing, while low hydration may contribute to underproofed bread.
- Monitoring fermentation time and temperature is crucial to avoid both overproofing and underproofing issues in sourdough.
Overproofing and Underproofing
Overproofing occurs when your dough ferments too long, losing its structural integrity, while underproofing happens when it doesn’t ferment enough, resulting in incomplete development. Factors like temperature and fermentation time play significant roles. High temperatures can lead to overproofing, whereas a weak starter might cause underproofing. Understanding scoring techniques can also influence the final outcome of your loaf as it allows for controlled expansion during baking.
Visually, overproofed loaves appear flat with minimal rise, while underproofed loaves often have uneven shapes and excessive ovenspring. Fermentation time impacts the overall quality of the loaf, influencing its texture and appearance significantly.
Crumb structure also varies: overproofed bread has a tighter crumb, while underproofed bread is dense and gummy.
Identifying Overproofed Sourdough
When you examine a loaf of sourdough, certain signs can reveal if it’s overproofed. Look for a flat appearance, a pale crust, and an irregular crumb structure that suggests excessive fermentation. Additionally, if the bread tastes more like alcohol than yeast, it’s a clear indication that you’ve let it rise too long.
Overproofed loaves often exhibit a very flat appearance that indicates a loss of structural integrity. This loss occurs because weak gluten development fails to retain the gas produced during fermentation, resulting in a dense and gummy texture.
Visual Indicators of Overproofing
Identifying overproofed sourdough can be a baker’s challenge, but several visual indicators can help you spot it before it’s too late.
Keep an eye out for these signs:
- Large Bubbles: If the dough has large bubbles with thin membranes, it’s a clear indicator of over-proofing.
- Sticky Texture: When your dough feels excessively sticky or wet, it suggests it’s fermented too long, which can occur if the sourdough starter is not regularly fed.
- Runny Dough: If the dough doesn’t hold its shape and appears runny after shaping, it’s time to reconsider. Properly proofed dough should maintain its structure and not appear overly wet.
Crust and Crumb Analysis
Crust and crumb analysis serves as an essential tool in diagnosing overproofed sourdough.
When you examine the crust, look for a dull color and a thin texture that might separate from the crumb. If the ear formation is weak or non-existent, that’s another red flag. Scoring can be tricky, often resulting in jagged cuts or a loaf that resembles a book opening. This is often due to the lack of gluten development that should occur during proper fermentation.
Now, turning to the crumb, you’ll notice a dense, gummy texture, with small, irregular holes that have ragged edges. The crumb lacks uniformity and feels overly moist, especially at the bottom. Proper proofing time is crucial to avoid these undesirable characteristics.
If the dough doesn’t maintain its shape and appears flat, it’s a strong indicator of overproofing.
Flavor Profile Changes
As you explore the flavor profile changes of overproofed sourdough, you’ll quickly notice that the bread’s taste can become overwhelmingly acidic. This increase in acidity often overshadows other flavors, leading to a somewhat unbalanced loaf.
You might find:
- A prominent tanginess that mightn’t be pleasant.
- A loss of depth, diminishing the complexity you expect in good bread.
- An overall flavor consistency that feels erratic and unpredictable. Longer fermentation can exacerbate these issues by increasing acidity levels.
While you might anticipate a sour explosion, overproofed bread doesn’t always deliver considerably more sourness than its underproofed counterpart. Instead, it can leave you with a flat, overly acidic experience that doesn’t satisfy your palate. Understanding these changes helps you identify and correct overproofing in your baking, especially when considering how fermentation impacts flavor.
Identifying Underproofed Sourdough
How can you tell if your sourdough is underproofed? Look for physical signs like a stiff dough that doesn’t jiggle when shaken, and large cracks on the top or sides of the loaf from rapid expansion.
If your bread has a pyramid shape, that’s uneven gas distribution. When you slice it, notice a tight, dense crumb lacking airiness, or even large tunnels near the top.
The texture might be gummy, and the crust could be hard and pale rather than golden brown. Additionally, underproofed sourdough often has a flat flavor and weak aroma, missing the complexity you expect. This lack of flavor complexity can be attributed to insufficient fermentation time, which is crucial for developing the rich taste characteristic of well-proofed sourdough.
Factors Influencing Proofing
When you’re proofing your sourdough, several key factors can make all the difference.
The type of flour, hydration levels, and the surrounding temperature all influence how your dough rises and develops flavor. Proofing duration can vary significantly based on these factors, affecting the final product’s quality and taste. Understanding these elements helps you achieve that perfect balance between overproofing and underproofing. For instance, maintaining an ideal hydration level of 70-80% can greatly enhance the dough’s texture and flavor.
Flour Type Effects
Understanding how flour type influences proofing is essential for achieving the perfect sourdough loaf. The choice of flour not only affects the dough’s structure but also its fermentation speed and flavor profile.
Here are three key factors to take into account:
- Protein Content: High-protein flours like bread flour create a stronger gluten network, enhancing rise and texture. Higher protein content is generally preferred for creating chewy baked goods. Additionally, using high-protein flours can lead to better gas retention during fermentation.
- Gluten Strength: Whole grain flours, with their weaker gluten, may lead to denser loaves, increasing the risk of overproofing.
- Fermentation Rate: Different flours impact fermentation; for instance, rye flour ferments quickly, which can alter your proofing timeline. The unique characteristics of each flour type can significantly influence the overall outcome of your sourdough.
Hydration Level Impact
Hydration levels play a crucial role in shaping the outcome of your sourdough, influencing everything from fermentation speed to crumb structure.
Calculated as the weight of water divided by the weight of flour, this percentage can range from 70% to 90%. Higher hydration increases dough elasticity, speeds up fermentation, and results in a lighter, more open crumb. However, if you’re not careful, this can lead to overproofing dough. Yeast activity slows notably during cold proofing, which can further affect your dough’s rise and texture. Conversely, low hydration can yield dense, gummy bread. Adjusting hydration impacts proofing dynamics; higher levels can shorten proofing times.
Monitoring your dough’s progress is essential to strike the right balance, ensuring you achieve that perfect airy, soft crumb that everyone loves.
Temperature and Time
While many factors contribute to the perfect sourdough, temperature and time stand out as essential elements that can make or break your loaf. The right balance can lead to delightful flavor and texture, while the wrong approach can result in disappointment.
Here are three key points to reflect on:
- Optimal Temperature: Aim for a range between 76°F to 78°F (24°C to 25°C) for active fermentation. Maintaining ideal temperatures is crucial for yeast and bacterial activity.
- Proofing Duration: Expect 1 to 4 hours at room temperature, adjusting based on environmental conditions. Longer bulk fermentation allows for better flavor and texture development.
- Poke Test: Use this method to gauge readiness, but remember it mightn’t capture all variables.
Reading the Crumb: What It Tells You
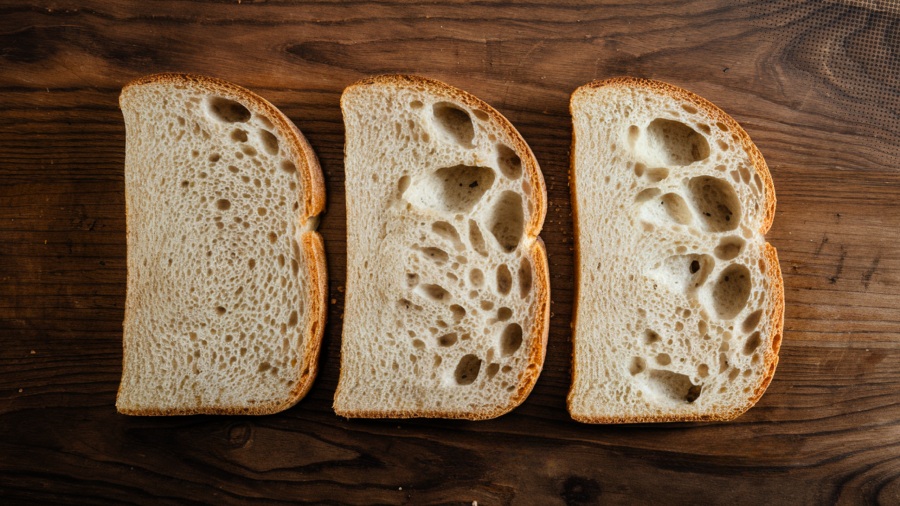
The crumb of your sourdough loaf speaks volumes about its proofing journey. By examining its texture and structure, you can uncover essential clues about your baking process. A light, airy crumb indicates proper proofing, while a dense, gummy texture suggests underproofing. Proper fermentation is crucial for achieving optimal texture and rise, which contributes to a delightful eating experience.
| Crumb Characteristics | Proofing Status |
|---|---|
| Open and chewy | Properly proofed |
| Dense with large holes | Underproofed |
| Flat and soggy | Overproofed |
| Even hole distribution | Well-proofed |
Look for the height and shape of your loaf, as they reveal significant details.
Correcting Proofing Issues
When you notice your sourdough loaf isn’t quite right, it’s crucial to pinpoint whether you’re dealing with overproofing or underproofing issues. Here’s how to correct these problems:
- For Overproofing: Identify if your loaf is dense and flat. Reduce the proofing time to maintain the dough’s structure, check your fridge temperature (it should be at or below 4°C), and bake immediately if overproofed, often in a sheet pan. Monitoring room temperature is essential to prevent over-proofing.
- For Underproofing: Increase the bulk fermentation time to allow for complete yeast activity, verify your starter is active, and create a warmer environment (75°F-80°F) to boost fermentation rates.
- Monitor Dough: Regularly check for signs of underproofing or overproofing to adjust your process accordingly.
Frequently Asked Questions
Can I Salvage Overproofed Dough?
Absolutely, you can salvage overproofed dough!
Try converting it into delicious focaccia by spreading it on an oiled baking sheet, or use it for a unique pizza crust topped with your favorites.
For a quick fix, roll it into flatbreads or tortillas.
You can also fold the dough to redistribute yeast and strengthen the gluten.
Just remember to monitor your dough closely next time to prevent overproofing!
What Temperature Is Ideal for Proofing Sourdough?
When it comes to proofing sourdough, you want to strike while the iron’s hot. The ideal temperature range is between 74°F and 86°F, with 76°F to 80°F being ideal.
This temperature encourages yeast and bacteria to thrive, promoting a rich flavor and proper fermentation. Keep an eye on your dough, as maintaining a consistent temperature guarantees your loaf rises beautifully.
Using tools like proofing boxes can help achieve that perfect environment.
How Does Humidity Affect Proofing?
Humidity substantially affects your sourdough proofing. When it’s high, your dough absorbs extra moisture, making it looser and harder to handle.
You might notice it ferments faster, increasing the risk of overproofing if you’re not careful. Adjusting your water content or reducing your starter can help manage this.
Keeping an eye on humidity levels using gauges can also help you maintain ideal proofing conditions, leading to better baking results.
What Tools Help Monitor Dough Fermentation?
Did you know that the ideal pH level for bulk fermentation usually ranges from 2.9 to 3.6?
To monitor dough fermentation, you can use pH testers to track acidity, ensuring it’s just right.
The aliquot jar method visually shows dough rise, while temperature and humidity sensors maintain perfect conditions.
With digital displays and advanced systems, you can streamline monitoring, reduce variability, and enhance your sourdough’s flavor and crumb quality effortlessly.
How Long Can Sourdough Be Stored After Baking?
After baking, you can store sourdough bread at room temperature for about 3-5 days.
Keep it in a moderate environment, ideally between 18-20°C (64-68°F).
If you want to maintain its crust, leave it unwrapped for the first day, then wrap it in a cotton towel or brown paper bag.
For longer storage, consider freezing it tightly wrapped, which keeps the flavor intact for 1-2 months.
Enjoy that fresh taste!
Light, Fluffy and Perfect: Your Journey to Better Bread
In mastering sourdough, understanding proofing is key. If you’ve ever pulled a loaf from the oven only to find a dense, gummy crumb, you’ve encountered underproofing.
Imagine this: a baker, excited for fresh bread, forgets to check the dough’s rise and ends up with a disappointing loaf. By learning to recognize signs of overproofing and underproofing, you can avoid these pitfalls and create delightful, airy loaves that are the envy of all your friends.