How to Vacuum Seal Canning Jars: The Ultimate Pantry Hack
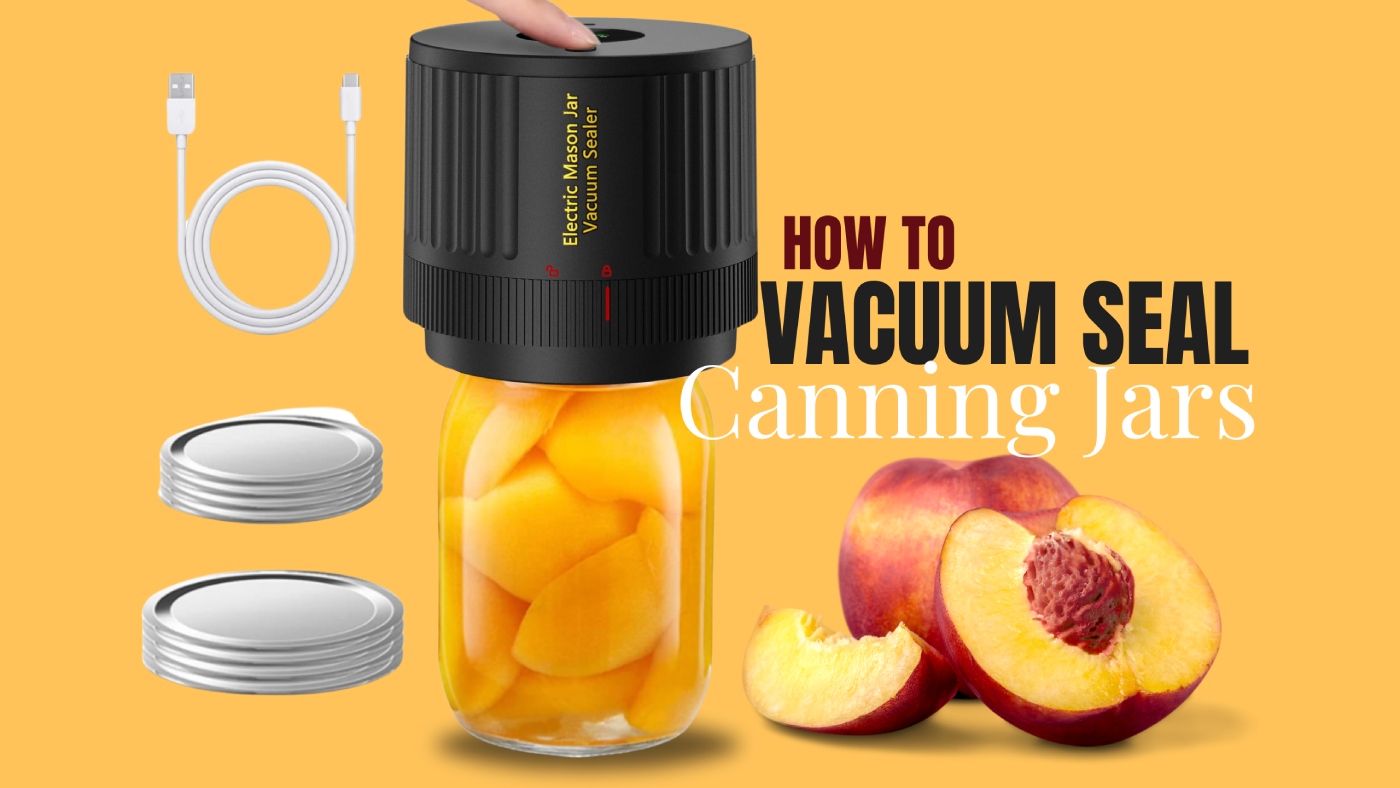
To vacuum seal canning jars, start with clean, dry jars and confirm they don’t have any cracks. Place a flat lid on the jar without the screw band.
Attach a vacuum sealer lid attachment and connect it to your vacuum sealer. Start the sealing process and afterward, check the seal for tightness.
Store the sealed jars in a cool, dark place, and be sure to label them with the contents and date. Remember, vacuum sealing isn’t a substitute for traditional canning. Want to know some additional tips for success? You’ll find more helpful information ahead.
Key Takeaways
- Clean and sterilize jars thoroughly, ensuring they are completely dry before vacuum sealing.
- Place a flat lid on the jar without the ring before using the vacuum sealer attachment.
- Connect the vacuum sealer attachment to the lid and initiate the sealing process to create an airtight seal.
- Store sealed jars in a cool, dark place, ideally between 50°F to 70°F, to maintain quality.
- Label jars with contents and dates to manage inventory and ensure consumption within a year.
Vacuum Sealing Explained
Vacuum sealing is an effective method for preserving food while preventing spoilage. This process involves removing air from a jar using a vacuum sealer, creating an airtight seal that blocks particles and pests from entering. It works particularly well for dry foods like flour, sugar, pasta, and beans. Proper sealing helps to prevent contamination from pests and particles, ensuring the longevity of your stored items.
When vacuum sealing, make certain your jar has at least 1 inch of headspace to avoid having contents sucked into the sealer.
Start by using clean, dry jars and inspect them for any scratches or imperfections that could compromise the seal. The rubber ring inside the lid is essential for creating a successful vacuum.
Place the flat part of the lid on the jar without screwing the band on just yet. Using a chamber vacuum sealer, position the jar inside the chamber, making sure it doesn’t touch the lid.
Once you initiate the vacuum sealing process, secure the lid with the band afterward.
Preparation and Equipment Needed
To successfully vacuum seal canning jars, you need to prepare both your jars and the right equipment. Start by cleaning and sterilizing your jars; they must be completely dry inside before use. Choose fresh, high-quality dry ingredients for the best results, and don’t forget to label your jars with stickers or markers to track contents and storage dates. You can use any size regular or wide-mouth jar, like Mason or Ball.
Next, make certain you have the necessary equipment. A vacuum sealer kit with a pump and lid attachments is essential. Alternatively, a vacuum sealing machine with a roll of vacuum bags works well. A stainless steel funnel set, available in regular and wide-mouth options, simplifies the filling process. Vacuum canning is known to extend shelf life by significantly reducing exposure to air, which helps in preserving food quality.
Have regular or wide-mouth canning lids and rings on hand for a proper seal, along with a vacuum hose attachment for your vacuum sealer.
Keep in mind that while vacuum sealing extends shelf life, it’s not a substitute for canning. Make sure the rim of each jar is clean and free of residue before sealing to make certain an effective seal.
Step-by-Step Vacuum Sealing Process
Starting the vacuum sealing process involves a few key steps to guarantee a successful seal. First, verify your jars are completely clean and dry. It is crucial to ensure that the jars are clean to prevent contamination issues during the sealing process.
Place the flat lid on top of the jar without the ring to hold it in place. Next, attach the vacuum sealer by using the canning jar vacuum sealer attachment on the lid, connecting it to the hose port of your FoodSaver appliance.
Once everything’s in place, initiate the sealing process by pressing the “Start” button on the vacuum sealer. After the machine finishes, check the seal by gently pressing on the lid; it should be tight with no movement.
If you’re using a chamber vacuum sealer, place the jars upright in the chamber, confirming the lid is set evenly and the band is loosely screwed on.
For alternative sealing methods, consider using a Foodsaver vacuum canister set for non-canning jars. Remember, avoid over-tightening the band before sealing to allow for proper vacuum creation.
If the seal fails, realign the lid and repeat the process. Always inspect your equipment to maintain peak performance for effective sealing.
Storage and Safety Guidelines
Proper storage and safety practices are essential for maintaining the integrity of your vacuum-sealed canning jars. Following these guidelines will help guarantee your food stays safe and fresh for longer.
- Temperature Control: Store your jars in a cool, dark place between 50°F and 70°F. Avoid areas near heat sources or direct sunlight, as temperatures above 95°F can spoil your food. Maintaining a stable temperature is crucial for preserving food effectively.
- Physical Handling: After cooling, remove screw bands to prevent moisture buildup. Store jars without the bands to easily spot broken seals, and avoid stacking them too high to keep seals intact.
- Environment Conditions: Keep jars in a clean, dry area. Use supportive materials when stacking, and always label and date your jars to manage inventory effectively.
- Long-Term Storage: Aim to consume canned goods within a year. Always check for spoilage signs before consuming, and discard any jars that are unsealed or improperly sealed.
Differences Between Canning and Vacuum Sealing
Maintaining your food’s safety and freshness involves understanding the differences between canning and vacuum sealing.
Canning uses heat to kill microorganisms, ensuring long-term preservation, while vacuum sealing removes air to prevent bacterial growth, making it ideal for short-term storage of dry goods and dehydrated foods.
Canning is effective for both high-acid and low-acid foods, but it can alter their texture and taste. In contrast, vacuum sealing preserves the original taste and nutrients of the food. Vacuum sealing is particularly beneficial for storing proteins, as it prevents spoilage by reducing oxidation.
You’ll need different equipment for each method—canning requires a pressure canner or boiling water canner, whereas vacuum sealing utilizes a vacuum sealer.
While canning has a lower initial cost, it demands more effort and time compared to vacuum sealing, which is quicker and easier.
However, vacuum sealing isn’t a substitute for canning when it comes to long-term food preservation. It’s important to recognize that canning destroys more microorganisms due to the heating process, while vacuum sealing doesn’t involve heat, making it less effective against certain bacteria.
Additional Tips for Success
Achieving success with vacuum sealing can be streamlined by following a few essential tips. Implementing these practices will help guarantee your jars seal properly and maintain freshness for longer.
- Prioritize Cleanliness: Always clean your jars and rims thoroughly. A clean surface is vital for achieving a proper seal.
- Inspect and Use New Lids: Check your lids for any dents or scratches, and opt for new lids whenever possible. This minimizes the chance of seal failures, especially since new lids ensure a more reliable sealing process.
- Maintain Correct Headspace: Leave the appropriate space between the food and the lid. This prevents food particles from interfering with the seal, guaranteeing a tight fit.
- Store Wisely: Keep your vacuum-sealed jars in a cool, dry place to maximize their shelf life. Avoid extreme temperatures and remove screw bands to prevent moisture accumulation.
Frequently Asked Questions
Can I Reuse Vacuum-Sealed Jars for Different Foods?
Yes, you can reuse vacuum-sealed jars for different foods. Just make sure the jars are clean and dry before you start.
Inspect them for damage, and avoid sealing foods with high moisture content to prevent spoilage. Ideal options include dry goods like rice and pasta, dehydrated foods, and low-moisture snacks.
Always use a new lid each time, and store the sealed jars in a cool, dry place for maximum freshness.
What Foods Are Best Suited for Vacuum Sealing?
When you’re considering vacuum sealing, focus on foods that benefit the most. Red meat, poultry, and seafood like fish or shrimp are excellent choices, as they stay fresh longer.
Fruits and vegetables also work well, but prepare them properly—peel fruits and blanch greens.
Dairy products, like cheese, can be sealed too, just make certain they’re not too moist.
You can even vacuum seal dry goods like grains and nuts for added freshness.
How Long Can Vacuum-Sealed Jars Last?
Imagine your favorite foods preserved like treasures, waiting to delight you later.
Vacuum-sealed jars can extend shelf life considerably, lasting 1 to 2 weeks in the fridge for perishables, and up to 1 to 2 years in the freezer for most items.
Dry goods can stay fresh for a year or more in the pantry.
Proper storage conditions and minimal air exposure are key to maximizing the longevity of your vacuum-sealed treasures.
Can Vacuum Sealing Prevent Freezer Burn?
Yes, vacuum sealing can effectively prevent freezer burn. By removing air and moisture, it minimizes dehydration and the formation of ice crystals, preserving your food’s texture and flavor.
To maximize its effectiveness, guarantee your freezer is set to 0 degrees Fahrenheit or below and cool foods properly before sealing.
Remember to keep your freezer organized and limit door openings to maintain consistent temperatures, further protecting your stored items from freezer burn.
Is Vacuum Sealing Suitable for Liquids?
Yes, vacuum sealing is suitable for liquids, but you’ll need to take some precautions.
Pre-chilling your liquids helps prevent boiling over during the sealing process. You can use specialized liquid vacuum sealers or chamber vacuum sealers for best results.
Remember to leave extra space at the pouch’s mouth and keep the sealing area clean to avoid seal failure.
Always check the integrity of the seal afterward for safety.
Why Vacuum Sealing Is a Game-Changer for Dry Good?
Vacuum-sealing canning jars are a fantastic way to extend the shelf life of your food. Did you know that vacuum-sealed foods can last up to five times longer than those stored in traditional methods? By following the steps outlined, you can guarantee your preserved goods stay fresh and flavorful.
Remember, proper sealing not only prevents spoilage but also preserves nutrients. With a little practice, you’ll master the art of vacuum sealing and enjoy your delicious creations for months.

