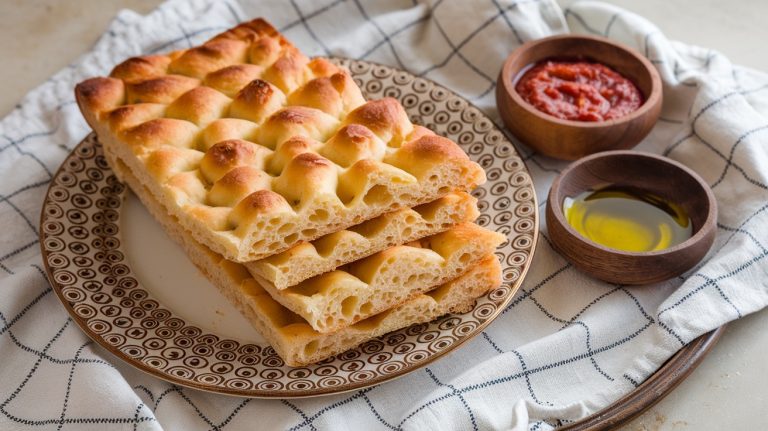
Focaccia With Butternut Squash: A Sweet and Savory Delight
Focaccia with butternut squash combines savory and sweet notes, perfect for autumn gatherings. Start by preparing a biga, letting it ferment to enhance flavor and texture.
Then, mix the biga with flour, yeast, and olive oil to create a smooth dough. After the dough rises, shape it and top it with caramelized butternut squash, garlic, fresh sage, and a sprinkle of Maldon salt.
Bake until golden brown and serve warm, drizzled with olive oil. This dish pairs wonderfully with soups or a crisp Riesling.
Keep going, and you’ll discover plenty more tips for perfecting this seasonal delight.
Key Takeaways
- Focaccia with butternut squash features flavors enhanced by a biga pre-ferment, resulting in a flavorful, airy bread.
- The dough is made with bread flour, olive oil, yeast, and tepid water, ensuring a chewy crust and light texture.
- Toppings include caramelized butternut squash, garlic, sage, and Maldon salt, providing a rich and balanced flavor profile.
- Bake the focaccia at 450°F for 25 to 30 minutes until golden brown, then serve warm or at room temperature.
- Pair it with a dry Alsatian Riesling or a warm butternut squash soup for a comforting autumn meal experience.
Recipe Overview
Focaccia with butternut squash is a celebration of autumn flavors, where the sweet, roasted squash melds beautifully with the airy, golden bread. This recipe yields two large loaves, perfect for sharing at family gatherings or cozy dinners.
You’ll love how the earthy sweetness of the butternut squash pairs with the fluffy texture of traditional focaccia, creating a delightful treat that’s both comforting and flavorful.
To make this dish, you’ll need key ingredients like fresh butternut squash, high-quality olive oil, garlic, and aromatic herbs such as sage. These elements come together to enhance the overall flavor profile, making every bite a warm embrace of autumn.
The dough requires a biga pre-ferment, which ferments for 18 to 24 hours, allowing the flavors to deepen and develop.
Once baked, serve your focaccia warm or at room temperature, drizzled with extra olive oil for richness. A sprinkle of Maldon salt and freshly grated cheese can elevate it further, turning your focaccia into a standout dish.
It’s not just a bread; it’s an experience that captures the essence of the season. Enjoy every bite!
Biga Preparation
To create the perfect focaccia, you can’t overlook the importance of biga.
This simple pre-ferment, made with just yeast, water, and bread flour, brings out complex flavors and a light, airy texture in your bread.
As it ferments for 18 to 24 hours, you’ll notice it bubbling up, signaling it’s time to elevate your focaccia dough.
Importance of Biga
Biga, the secret weapon in artisan bread making, plays an essential role in elevating the flavor and texture of your focaccia. This pre-ferment is a blend of yeast, water, and flour, allowed to ferment for 18 to 24 hours. During this time, the yeast works its magic, creating a bubbly texture that signals the development of complex flavors.
When you incorporate biga into your dough, you’re not just adding an ingredient; you’re enhancing the overall quality of your focaccia. It contributes to a lighter, airier structure, ensuring each bite is full of delightful texture.
Plus, it helps create a chewier crust that’s simply irresistible. The benefits of biga extend beyond just flavor and texture. A focaccia made with biga boasts improved shelf life, allowing you to enjoy it longer without sacrificing freshness.
Its depth of flavor beautifully complements toppings like butternut squash and herbs, transforming your focaccia into a gourmet delight. So, don’t skip this vital step; embrace biga, and watch your focaccia rise to new heights!
Biga Ingredients Explained
Creating biga is a straightforward yet rewarding process that sets the foundation for exceptional focaccia. This pre-ferment not only enhances flavor but also contributes to the dough’s texture. To prepare your biga, you’ll need a few key ingredients:
- Yeast: Activates fermentation and creates the necessary bubbles.
- Water: Tepid water helps dissolve the yeast for better integration.
- Flour: Bread flour is ideal for developing structure and strength in your dough.
- Time: Allowing the mixture to ferment for 18 to 24 hours is vital for flavor development.
Start by mixing the tepid water and yeast until dissolved. Then, add the bread flour and stir until just combined. Cover the bowl tightly to maintain warmth and let it ferment.
During this time, the biga will develop a bubbly texture, signaling that it’s ready to be folded into your focaccia recipe. Using a well-prepared biga is essential; it results in a lighter, airier focaccia that showcases a delightful flavor complexity.
Biga Fermentation Process
While you wait for your biga to ferment, the magic of transformation begins as the yeast works its wonders. This pre-ferment is essential for enhancing the flavor and texture of your focaccia dough. To prepare your biga, mix 1 part yeast with 5 parts flour and 4 parts tepid water, stirring until well combined. Then, cover it tightly and let it rest in a warm place for 18 to 24 hours.
As your biga ferments, you’ll notice a bubbly texture forming, signaling that it’s ready to be incorporated into your dough. This fermentation process not only develops the yeast but also intensifies the flavors, giving your focaccia a more complex profile and an airy crumb.
Here’s a quick breakdown of the biga preparation:
| Ingredient | Ratio | Purpose |
|---|---|---|
| Yeast | 1 | Initiates fermentation |
| Flour | 5 | Provides structure and flavor |
| Tepid Water | 4 | Activates the yeast |
Dough Making Process
With the biga ready to go, the next step in your focaccia journey is mixing and kneading the dough. Start by combining the biga, additional flour, yeast, olive oil, and water in a mixer.
It’s vital to use a high-quality baking scale to guarantee accurate measurements for your ingredients, as precision in increments can influence dough hydration and fermentation.
Begin mixing on low speed, then gradually increase to medium. You’ll want to mix until the dough becomes smooth and elastic, which should take about 8 minutes. Keep an eye on the dough’s moisture; if it feels too sticky, add more flour a little at a time. Conversely, if it’s too dry, add small amounts of water until you achieve a tacky consistency.
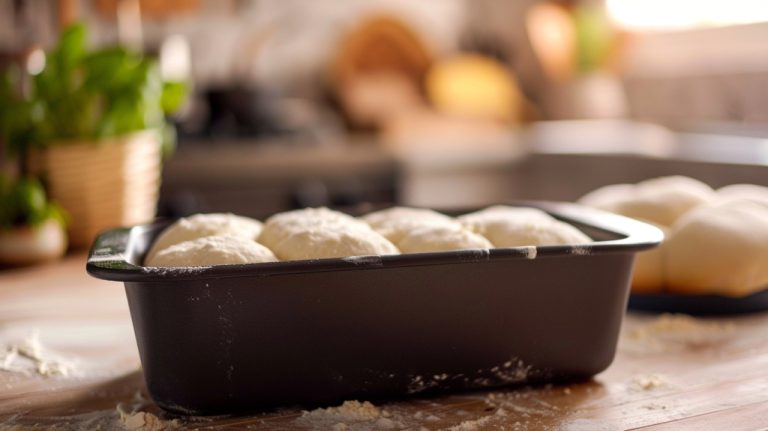
Once you’ve mixed everything well, shape the dough into a round ball and place it in a greased bowl. Cover the bowl tightly to keep the dough from drying out, allowing it to rise in a warm spot for 1 to 1.5 hours, or until it doubles in size. This step is vital for best fermentation and flavor.
Rising and Shaping Process
The rising and shaping process is essential for achieving that light, airy texture in your focaccia. After mixing the ingredients, you’ll shape the dough into a smooth ball and place it in a greased bowl.
Now, let it rise in a warm spot until it doubles in size—this usually takes about 1 to 1.5 hours. During this initial rise, the dough ferments naturally, enhancing its flavor and texture, much like the mixing and fermentation techniques used in sourdough bread.
Once the dough has risen, gently cut it in half. Shape each half into a ball of dough, brushing them with olive oil before covering them to let the mixture rise again for another hour. During this second rise, the dough should become puffy and airy.
Here’s what to keep in mind for this process:
- Verify the dough is smooth before the first rise.
- Allow sufficient time for the dough to rise properly.
- After the second rise, carefully stretch or roll out the dough.
- Don’t forget to add your favorite toppings before baking.
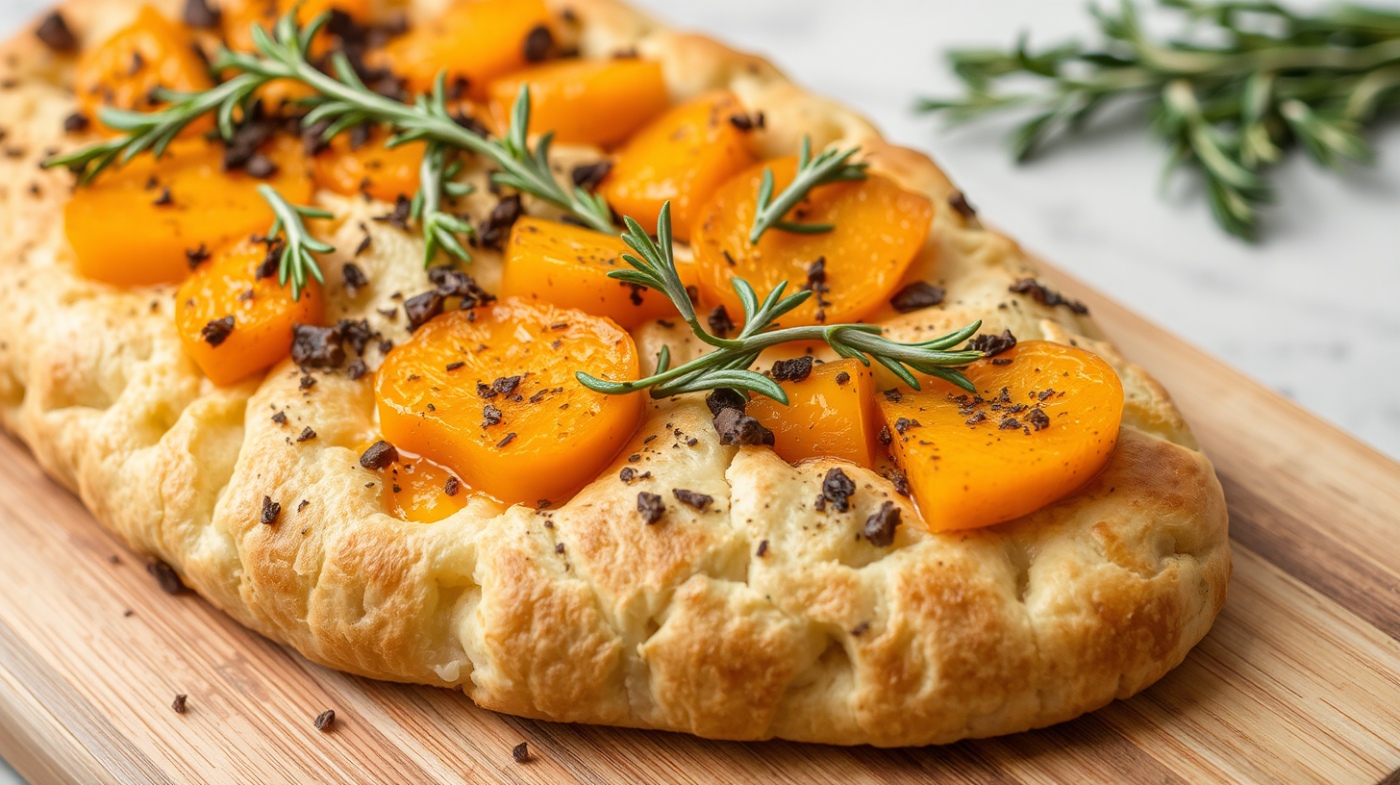
After shaping, you can cut the focaccia into desired portions, creating a perfect canvas for those delicious butternut squash and herb toppings.
Topping Preparation

To create a delicious topping for your focaccia, heat olive oil in a skillet and add cubed butternut squash. Cook the squash until the edges are nicely browned, which enhances its flavor and texture. This step is essential; the caramelization brings out a rich, sweet taste that perfectly complements the bread.
Once the squash is golden, add minced garlic and, if you like a bit of heat, some chopped chilies. Cook until the garlic turns golden, filling your kitchen with an irresistible aroma.
Next, mix in fresh sage and a sprinkle of Maldon sea salt, creating a well-balanced topping that elevates your focaccia.
After preparing the topping, make certain to distribute it evenly over the dough. This guarantees that every bite bursts with flavor.
Allow the dough to rise again for about 30 minutes after adding the topping, which helps achieve that light and airy texture you’re aiming for.
Baking and Serving
A beautifully risen focaccia, topped with roasted butternut squash and fragrant herbs, is ready for the oven.
Preheat your oven to 450°F and generously coat your baking sheet with olive oil to prevent sticking. After the focaccia has risen for a second time, pop it in the oven for 25 to 30 minutes. You’ll know it’s done when it turns a lovely golden brown and reaches an internal temperature of 200°F.
Once baked, drizzle the focaccia with additional olive oil and sprinkle it with Maldon salt and grated pecorino cheese for extra flavor. Let it cool on a wire rack for about 5 minutes before slicing; this keeps the texture perfect and prevents sogginess.
Here’s how to serve it:
- Serve warm or at room temperature.
- Pair it with soups for a delightful contrast.
- Enjoy it as a standalone dish at gatherings.
- Store leftovers in an airtight container for up to 3 days.
Suggested Pairing
Baked to perfection, your focaccia with butternut squash deserves thoughtful pairings to elevate its delightful flavors.
For a wine pairing that enhances the dish’s autumnal flavors, consider a dry Alsatian Riesling. Its intense fruit notes beautifully complement the sweetness of the roasted squash, creating a harmonious balance.
If you prefer something lighter, a crisp Pinot Grigio can work wonders, cutting through the richness of the focaccia with its invigorating acidity.
For those seeking a heartier option, a light-bodied Pinot Noir provides an intriguing contrast to the earthy flavors, adding depth to your meal.
If you’re in the mood for a non-alcoholic option, sparkling apple cider is a fantastic choice. Its effervescence acts as a rejuvenating palate cleanser, perfectly matching the sweetness of the butternut squash.
To create a comforting and cohesive autumn meal experience, think about serving your focaccia alongside a warm butternut squash soup.
This combination not only warms the soul but also elevates the dining experience, making your meal a delightful celebration of seasonal flavors.
Frequently Asked Questions
What Pairs Well With Butternut Squash?
When you’re pairing with butternut squash, think earthy herbs like sage, tangy cheeses such as goat cheese, crunchy nuts like walnuts, and a splash of balsamic vinegar to enhance its natural sweetness and depth.
What Does Focaccia Pair Well With?
Focaccia pairs wonderfully with hearty soups, vibrant salads, and creamy cheeses like Gruyere. You’ll love how a drizzle of balsamic glaze enhances roasted veggies, creating a delightful contrast that elevates any meal you serve.
Why Do You Poke Holes in Focaccia?
You poke holes in focaccia to create a unique texture, ensuring even topping distribution and preventing excessive bubbling. This technique enhances flavor, moisture, and promotes a light, airy structure for a perfectly baked bread.
What Are the Two Types of Focaccia?
You might think focaccia’s just focaccia, but it’s more than that! You’ve got Focaccia al Rosmarino, aromatic with rosemary, and Focaccia Bianca, a versatile blank canvas ready for any topping you desire. Enjoy both!
Savor and Enjoy This Seasonal Treat
As you pull that golden-brown focaccia from the oven, the aroma of roasted butternut squash dances through the air, inviting everyone to gather ’round. Each bite is a warm hug, with the crisp exterior giving way to a soft, flavorful interior.
So, don’t just savor this delicious creation; let it be the centerpiece of your next gathering. Pair it with a glass of crisp white wine, and watch as smiles bloom like flowers in spring.