How to Paint Cookies: Easy Edible Art Guide
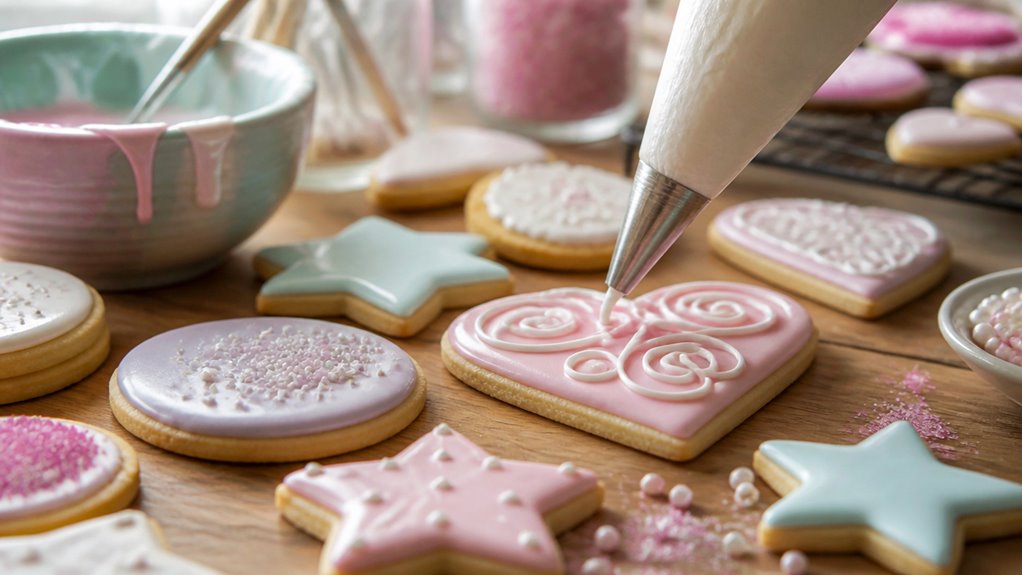
To paint cookies, first make sure they’re completely cool and iced with a smooth, dry royal icing base.
Use food coloring gels mixed with vodka or water for vibrant, adjustable paints.
Select fine synthetic brushes, keeping colors separate to avoid contamination.
Apply thin, even layers, letting each dry fully before adding details to prevent smudging.
Dry cookies on a flat surface in a cool, dry place, then handle carefully to preserve designs.
Following these steps sets a solid foundation for creating beautiful edible art.
Key Takeaways
- Cool cookies completely and apply a smooth royal icing base; let it dry thoroughly before painting to prevent smudging and bleeding.
- Mix edible paints using food coloring gels, vodka, or water, adjusting consistency for smooth, translucent, or opaque effects.
- Use small, fine synthetic brushes, keeping separate brushes for each color and removing excess paint to avoid contamination and drips.
- Apply thin paint layers, allowing each to dry fully before adding more, and keep the drying area cool, dry, and away from direct light.
- Store fully dried cookies in airtight containers with parchment layers, avoiding stacking or sealing before paint is completely dry.
Easy Guidelines & Ingredients for Edible Cookie Painting
| Category | Details |
|---|---|
| Recipe Type | Edible cookie decorating technique using royal icing and food-safe paint |
| Skill Level | Beginner to Intermediate |
| Prep Time | 20 minutes for setup and paint mixing |
| Drying Time | 4 to 5 hours minimum, or overnight for best results |
| Total Time | 4 hours 20 minutes to overnight |
| Yield | 12 decorated cookies, depending on size and detail |
| Cookie Base | Baked cookies with a smooth royal icing surface |
| Main Ingredients | Fully cooled cookies, royal icing, food coloring gels, vodka or water, vanilla extract, cocoa powder for natural tones |
| Tools Needed | Fine synthetic brushes, small bowls, toothpicks or skewers, paper towels, parchment paper, airtight container |
| Best Paint Consistency | Thin enough to brush smoothly, but not watery or runny |
| Ideal Drying Surface | Flat, clean, cool, and dry surface away from humidity |
| Storage Method | Airtight container with parchment layers; keep in a cool, dry place |
| Best For | Holiday cookies, party treats, gifts, and detailed edible artwork |
Prepare Your Cookie Surface for Painting

Before you start painting, make certain your cookie surface is fully prepared to achieve clean, crisp designs.
Begin by cooling your cookies completely; warm cookies can cause icing to melt or smudge.
Start with fully cooled cookies to prevent icing from melting or smudging during decoration.
Apply a smooth, even layer of royal icing and allow it to dry thoroughly. This usually takes several hours or overnight.
Make certain the icing is completely firm and no longer tacky, as painted designs adhere best to a stable, dry surface.
If you prefer flood icing, level it so the surface is flat and smooth before drying.
Avoid painting on wet or sticky icing unless you’re intentionally doing wet-on-wet watercolor techniques.
Proper surface preparation prevents bleeding and helps your paint strokes remain sharp and vibrant.
For best results when using gel-based colors, remember that thorough stirring ensures even color dispersion and vibrant paint strokes.
Choose the Best Edible Paints for Cookie Painting
Once your cookie surface is perfectly set and dry, selecting the right edible paints will define the quality and vibrancy of your designs. You want paints that offer strong pigmentation, easy application, and safe ingredients.
Consider these options:
- Food coloring gel mixed with vodka – delivers vibrant, smooth coverage and dries quickly without bleeding.
- Food coloring diluted with water – ideal for soft watercolor effects but less intense colors.
- Food coloring combined with vanilla extract – adds subtle flavor while producing solid color.
- Cocoa powder mixed with water – perfect for natural brown tones and shading.
Choose paints suited to your design style and make certain you stir them well before use to maintain even color distribution. Using precision decorating tools can help apply these paints with greater control and detail.
Mix and Adjust Paint Consistency for Best Results
Achieve the perfect paint consistency by thoroughly mixing your edible colors before each use to prevent pigment settling and clumping.
Stir gently with a toothpick or skewer to break up any lumps. Use a small amount of gel color, as it’s highly concentrated; adding too much can overwhelm the mixture.
Adjust the thickness by adding a few drops of your chosen liquid, such as vodka or water, to thin the paint for lighter, translucent strokes. For more intense coverage, reduce liquid to thicken the paint.
Always test your paint on a scrap surface or parchment first to check flow and opacity. Before applying paint to your cookie, dab excess liquid from your brush on a paper towel to avoid bleeding.
Aim for smooth brushstrokes that glide without pooling or dragging on the icing.
For best results, consider using food-safe edible glues when attaching painted decorations to maintain both appearance and safety.
Pick the Best Brushes and Tools for Cookie Painting
Select small, food-safe paintbrushes specifically designed for edible projects to guarantee precise control and safety when painting cookies. Using the right brushes and tools makes your work cleaner and more enjoyable. Here’s what you need to keep in mind:
- Choose brushes with fine, synthetic bristles. They hold paint well and don’t shed on your cookies.
- Use different brushes for each color to avoid mixing and muddying your paints.
- Keep a toothpick or skewer handy to stir paint and break up pigment clumps for smooth application.
- Have a paper towel nearby to dab excess paint from brushes, preventing unwanted drips or bleeding on icing.
Using these tools properly ensures your painted cookies come out crisp and vibrant every time. For added precision, consider tools that offer a firm, non-slip grip to maintain control during detailed decorating.
Master Basic Brush Techniques for Cookie Painting
Practice controlled brushstrokes to lay a strong foundation for your cookie painting.
Develop precise brush control to create a solid base for beautifully decorated cookies.
Hold your brush at a slight angle and apply steady pressure to create smooth, even lines.
Use the tip for fine details and the belly for broader strokes.
Remove excess paint on a paper towel before painting to prevent bleeding.
Employ short, deliberate strokes rather than long, sweeping motions to maintain control.
For textured effects, try dry brushing by lightly dragging a nearly dry brush across the surface.
When switching colors, clean your brush thoroughly or use a separate one to avoid contamination.
Keep your paint consistency balanced—thick enough to cover but thin enough to flow.
Mastering these basic techniques guarantees crisp, clean designs on your cookies.
For an elegant, metallic finish, consider using edible luster dust to paint shimmering details.
Add Depth by Layering and Detailing Your Cookies
When you want your cookie designs to stand out, layering and detailing add the necessary depth and dimension. Start by applying a base layer of paint, let it dry completely, then build up shadows and highlights with additional layers.
Use a fine-tipped brush for precise details like outlines, veins, or accents to enhance texture and realism.
Follow these steps to add depth effectively:
- Apply thin, even layers, allowing each to dry fully before the next.
- Use darker shades first, then gradually add lighter tones to create gradients.
- Incorporate small details with a fine brush to emphasize edges and features.
- Avoid overloading the brush to prevent bleeding and maintain crisp lines.
Layering carefully results in dynamic, visually rich cookies that truly pop. For best results, choose glycerin-based liquid colors to ensure smooth blending without altering your cookie’s texture.
Dry and Protect Your Painted Cookies
When it comes to drying your painted cookies, patience is key! You’ll want to give them about 4 to 5 hours to dry completely. This helps avoid any smudging or color bleeding, which can be such a bummer.
Make sure to place them on a flat, clean surface. It’s best not to stack or move them around until they’re fully set. Once they’re dry, store them in an airtight container. Just remember to separate the layers with parchment paper to keep your designs safe and fresh!
Proper storage in an airtight container with resealable packaging helps maintain the quality and longevity of your decorated cookies.
Ensure Complete Drying
Although it might be tempting to handle your cookies right after painting, allowing them to dry completely is essential to preserve your artwork and prevent smudging.
Follow these steps to ensure thorough drying:
- Place your painted cookies on a flat, clean surface in a well-ventilated area away from direct sunlight or heat sources.
- Allow them to dry undisturbed for at least 4–5 hours, or longer if your paint mixture contains more liquid.
- Avoid stacking or packaging cookies before they feel completely dry to the touch and show no tackiness.
- Use a gentle fan to speed drying if needed, but don’t blow directly on the painted surface to prevent dust or debris from settling.
Patience during drying guarantees crisp, vibrant designs and prevents damage. Using silicone-coated parchment paper beneath your cookies can help prevent sticking and protect delicate designs during the drying process.
Avoid Smudging Risks
Since painted cookie surfaces remain delicate until fully set, taking proactive steps to dry and protect them minimizes smudging risks.
After painting, place your cookies on a flat, clean surface away from drafts and humidity. Avoid touching or moving them for at least 4–5 hours to allow the paint to harden completely.
If you need to speed drying, use a fan set on low, but never direct heat or sunlight, which can cause uneven drying or bleeding.
To shield your work, cover the drying area loosely with a tent of wax paper or a clean box. Avoid sealing tightly, which traps moisture.
Handle painted cookies only by the edges after drying to maintain your design’s integrity and prevent accidental smears.
For optimal results, ensure the drying environment has controlled moisture levels to prevent surface defects and preserve the finish.
Proper Storage Methods
Store your painted cookies in a cool, dry place to preserve their vibrant designs and prevent moisture damage. Proper storage protects your work from smudging and color fading.
Follow these steps to keep your cookies fresh and beautiful:
- Make sure cookies are completely dry. Wait at least 4–5 hours before handling or packaging.
- Place cookies in a single layer on a flat surface or between parchment layers to avoid sticking or abrasion.
- Store them in an airtight container to block humidity and airborne particles.
- Keep containers away from direct sunlight and heat sources to prevent color fading and icing softening.
For added protection, consider using airtight containers designed to maintain freshness and prevent moisture intrusion.
Troubleshoot Cookie Painting Problems
When your painted cookie designs don’t turn out as expected, the issue often lies in surface preparation or paint consistency. Make sure your royal icing base is completely dry and smooth before painting. Any tackiness causes bleeding or smudging.
If you notice colors pooling or running, thin your paint less. A thicker consistency improves control and opacity.
Conversely, if brushstrokes appear streaky or uneven, slightly thin your paint for smoother coverage.
Always remove excess liquid from your brush with a paper towel before touching the cookie to prevent unwanted spread. Use separate brushes for different colors to avoid contamination. If pigments settle, stir your paint thoroughly.
Finally, let each layer dry fully before applying the next to maintain crisp, vibrant details without blending or smearing.
Store and Package Painted Cookies Safely
Before you dive into storing or packaging your painted cookies, it’s super important to ensure they’re completely dry. This can take anywhere from about 15 minutes to a few hours, depending on how you painted them. So, maybe grab a cup of coffee and do something else while you wait!
Once they’re dry, go ahead and grab some airtight containers. It’s a good idea to use layers of parchment paper or tissue to separate the cookies. This helps prevent smudging and sticking, which is a total lifesaver for those delicate designs.
And here’s a tip: try to avoid putting plastic wrap directly on the painted surface. It can mess up all your hard work, so keep those designs safe.
Proper Drying Time
Although it can be tempting to package your painted cookies immediately, you need to allow them to dry completely to guarantee the designs set properly and don’t smudge.
Proper drying ensures your artwork stays intact and the cookies remain beautiful.
Follow these steps for best drying:
- Place your painted cookies on a flat surface lined with wax paper to prevent sticking.
- Keep them in a cool, dry area away from direct sunlight and humidity.
- Allow at least 4–5 hours for drying, or longer if your paint is thicker or layered.
- Avoid moving or stacking the cookies until you’re sure the paint is fully set.
Patience here pays off by preserving your detailed painted designs without damage.
Packaging Materials Choices
To store and package your painted cookies safely, select materials that protect the delicate artwork while preventing moisture and damage.
Use food-safe, acid-free parchment or wax paper to separate individual cookies and avoid smudging. Choose rigid containers, such as plastic or tin boxes, with snug lids to prevent movement during transport.
Avoid stacking painted surfaces directly; if space is tight, use cardboard inserts or cookie dividers to keep them secure. Include a silica gel packet or small moisture absorber to reduce humidity inside the packaging.
Store cookies in a cool, dry place away from direct sunlight to preserve colors and prevent condensation. Label packages clearly if gifting or shipping, and handle with care to maintain the integrity of your beautifully painted designs.
Frequently Asked Questions
Can I Eat the Paint Used on Cookies Safely?
Yes, you can safely eat the paint used on cookies as long as it’s made from edible ingredients like food coloring mixed with vodka, water, or vanilla extract.
Always make sure you use food-safe gels or powders and avoid non-edible paints.
Mix your colors thoroughly and apply with clean, food-safe brushes.
This keeps your painted cookies both beautiful and safe to enjoy without any health risks.
How Long Do Painted Cookies Stay Fresh?
Painted cookies stay fresh for about 5 to 7 days when stored properly.
You should keep them in an airtight container at room temperature, away from heat or humidity, to maintain their texture and prevent the paint from smudging.
Avoid stacking until the paint fully dries, which takes around 4–5 hours.
For longer freshness, you can freeze them, wrapped tightly, and thaw before serving to preserve both flavor and decoration.
Can I Freeze Painted Cookies Without Damaging the Design?
Think of freezing painted cookies like putting a delicate snowflake in a freezer; without care, it can lose its shape.
You can freeze painted cookies, but only if the paint and icing are fully dry and hardened.
Wrap them tightly in plastic wrap and place them in an airtight container to prevent moisture damage.
Thaw them slowly at room temperature to avoid condensation, which can smudge or ruin your design.
What Is the Best Way to Transport Painted Cookies?
The best way to transport painted cookies is to let them dry completely, at least 4–5 hours, before packing.
Use a sturdy box with layers of parchment or wax paper between cookies to prevent smudging. Place a non-slip mat or padding at the bottom to minimize movement.
Keep the box flat and avoid stacking heavy items on top. Transport in a cool, dry environment to maintain the paint’s integrity and avoid moisture damage.
How Do I Remove Paint Mistakes Without Ruining the Cookie?
To remove paint mistakes without ruining the cookie, act quickly while the paint is still wet.
Use a clean, damp brush or a damp, food-safe cotton swab to gently lift off the unwanted paint.
Avoid scrubbing hard to prevent damaging the royal icing surface.
If the paint has dried, carefully scrape it off with a toothpick, then touch up with fresh paint.
Let the cookie dry completely before handling further.
Bring Your Cookie Designs To Life
Just like a blank canvas invites an artist’s first stroke, your cookie’s smooth surface welcomes each brush of edible paint.
Remember, patience and layering transform simple shapes into vibrant masterpieces, much like how a chef perfects a recipe through trial and error.
With the right tools and techniques, your painted cookies won’t just look stunning; they’ll taste as delightful as they appear.
Keep practicing, and your edible art will always shine.