Gluten Free Dairy Free Pancake Recipe: Fluffy Every Time
You can make fluffy gluten-free, dairy-free pancakes by combining gluten-free all-purpose flour with almond and tapioca flours, using flax eggs as a binder, and unsweetened almond milk for moisture.
Whisk wet and dry ingredients separately, then mix just until combined and let the batter rest briefly for best texture.
Cook pancakes on medium heat, flipping when bubbles form and edges set.
Explore simple tweaks and tips to customize flavor and cooking for perfect results.
Key Takeaways
- Use a gluten-free flour blend (like almond flour with tapioca starch) and dairy-free milk such as unsweetened almond milk for the base.
- Replace eggs with flax eggs (1 tbsp ground flaxseed + 3 tbsp water) and add xanthan gum for structure and fluffiness.
- Whisk wet and dry ingredients separately, then combine gently; rest the batter 5–10 minutes for better texture.
- Cook pancakes on medium heat (325–350°F), flipping once bubbles form and edges look dry to achieve golden brown pancakes.
- Enhance flavor with vanilla extract, cinnamon, or mix-ins like blueberries; adjust sugar if using sweetened plant milk.
Quick Recipe Table for Gluten Free Dairy Free Pancake
| Section | What to use / do | Key amounts | Quick tips |
|---|---|---|---|
| Dry ingredients | Gluten-free all-purpose flour, almond flour, (optional) tapioca starch, baking powder, baking soda, salt | 1 ½ cups GF flour, ½ cup almond flour, baking powder 1–2 tbsp, baking soda up to 1 tsp | If your GF blend lacks a binder, add a little xanthan gum for better fluff |
| Wet ingredients | Flax eggs, unsweetened almond milk (or other plant milk), neutral oil, sweetener, vanilla (optional) | Each flax egg: 1 tbsp flax + 3 tbsp water; oil 1–2 tbsp | Let flax eggs gel 5–15 min; add milk gradually to control batter thickness |
| Mix | Whisk dry in one bowl, wet in another; combine gently | — | Mix just until combined (don’t overmix) |
| Rest | Let batter sit | 5–10 min (up to 20) | Resting improves gluten-free texture and reduces grit |
| Cook | Preheat pan/griddle; pour batter; flip once | Medium heat (about 325–350°F) | Flip when bubbles form and edges look set; keep heat moderate to avoid burning |
| Serve / store | Serve with fruit, syrup, nut butter; refrigerate or freeze | Fridge 3–4 days; freeze up to 3 months | Cool fully before storing; reheat in toaster for best texture |
Ingredients for Gluten Free Dairy Free Pancakes

When making gluten-free dairy-free pancakes, choosing the right combination of flours is crucial to achieve a good texture and flavor. You might combine gluten-free all-purpose flour (1½ cups) with fine blanched almond flour (¾ cup) and tapioca starch or coconut flour to create a balanced mix that mimics traditional pancake batter.
Alternatively, you can use specialized blends like Pamela’s Bread Mix or Bob’s Red Mill 1:1 Gluten Free Flour for simplicity. Leavening agents such as baking powder (½ to 1½ tablespoons) and baking soda (¼ to 1 teaspoon) are crucial to ensure your pancakes rise properly.
For sweetness, options like maple syrup, honey, or sugar enhance flavor without dairy. Finally, incorporating neutral oils, such as avocado or sunflower oil, adds moisture and improves texture. Liquids like almond or coconut milk keep the batter smooth and dairy-free.
Resting the batter for about 10 to 15 minutes allows it to thicken and results in better pancake texture. Measuring your ingredients precisely with a digital baking scale can greatly improve consistency and outcome.
Egg and Milk Substitutes for Gluten Free Dairy Free Pancakes
How do you replace eggs and milk in gluten-free, dairy-free pancakes without sacrificing texture or flavor?
For eggs, flax eggs made by mixing 1 tablespoon ground flaxseed with 3 tablespoons water and letting it gel for 5-15 minutes are popular. They bind well, especially with ½ teaspoon xanthan gum added, improving fluffiness and structure.
The recipe’s success often relies on using a rice-based flour blend combined with xanthan gum for the best texture. Additionally, experimenting with different add-ins can enhance flavor and texture, much like customizing a sourdough bread mix.
Chia eggs and commercial replacers are options, but may cause flatness or off-flavors. For milk, unsweetened almond milk is preferred, though soy, rice, coconut (diluted if canned), and hemp milk work well.
Vanilla almond milk can enhance flavor. Remember to adjust sugar if using sweetened plant milks. Combining these substitutes thoughtfully maintains your pancakes’ texture and taste while keeping them gluten- and dairy-free.
Mixing the Batter for Light and Fluffy Pancakes

Alright, let’s get started! First, you’ll want to whisk together your wet ingredients until they’re nice and combined, and you should aim for that pale color. Once that’s done, it’s time to carefully mix in the dry ingredients. You’re looking to create a smooth, thick batter here.
Just remember, you don’t want it to be too runny or too thick. If it seems off, just add a splash of milk to get it just right. Keep in mind that at high altitudes, adjustments in hydration and ingredient ratios may be necessary to maintain the perfect batter consistency, due to reduced air pressure.
Now, here’s a little tip: letting the batter rest for about 10 to 20 minutes really makes a difference. This resting time helps thicken it up and ensures that your pancakes come out light and fluffy. Trust me, you’ll taste the difference!
For a homemade touch, you can prepare your own gluten-free pancake mix ahead of time, which is free of gluten, dairy, and refined sugar and can be stored for weeks.
Proper Ingredient Combining
Why does the order and method of combining ingredients matter so much for gluten-free, dairy-free pancakes? The key lies in achieving the right texture without gluten’s binding power.
First, whisk your wet ingredients separately: egg, sugar, oil, and dairy alternatives to ensure smooth integration. This step is especially important because using dairy-free milk alternatives like almond or coconut milk can affect batter consistency and moisture levels. Incorporating the right hydration level is crucial, as it significantly impacts the final texture of the pancakes.
Second, combine your dry ingredients like gluten-free flour, baking powder, and salt independently to distribute leavening agents evenly.
Third, gently pour the wet mixture into the dry and whisk just until combined; over-mixing can break down air pockets essential for fluffiness.
This method prevents dense pancakes and promotes lightness. Letting the batter rest briefly after mixing also helps thicken it and improves texture.
Following this sequence ensures your pancakes turn out tender and airy every time.
Achieving Ideal Batter Consistency
When should you test your batter to guarantee it’s just right for gluten-free, dairy-free pancakes? The ideal moment is with the first pancake.
Your batter should be neither runny nor dough-thick. If it’s too thick, add 1-2 tablespoons of your dairy-free milk to improve spreadability. If too thin, incorporate more gluten-free flour gradually. Using silicone molds can help maintain consistent shapes and sizes for pancakes, ensuring even cooking and presentation.
After mixing, let the batter rest for 5-10 minutes—up to 20 if possible—to hydrate the flour fully and avoid graininess. Whisk ingredients separately, then combine until smooth but don’t over-mix, preventing dense or rubbery texture. Using a gluten free baking flour blend that contains a binder such as xanthan gum is key to achieving the best texture and structure.
Cooking Tips for Perfect Gluten Free Dairy Free Pancakes
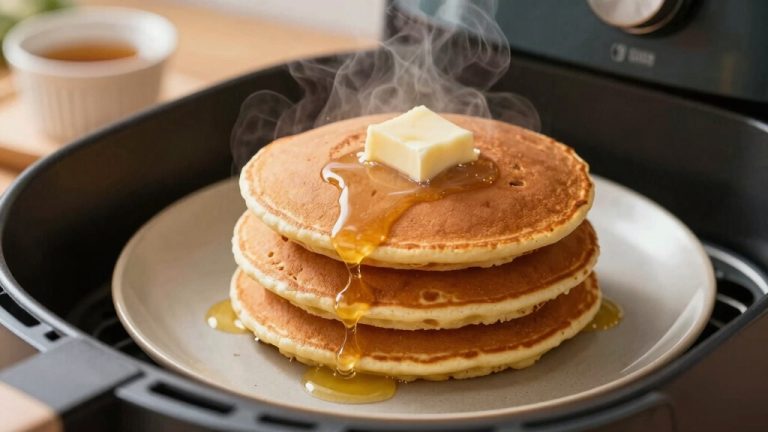
If you want to make perfect gluten-free, dairy-free pancakes, let’s talk about the batter first. You want it to be thick, but still pourable—that’s the sweet spot for even cooking. Adjust the thickness by adding 1–2 tablespoons of milk if the batter is too thick or 1–2 tablespoons of gluten-free flour if it’s too thin to maintain the ideal consistency. Now, when it comes to the heat, medium is your best friend here. Start at that temperature and watch how your first pancake turns out; you might need to adjust it a bit.
Oh, and flipping? That’s crucial! Keep an eye out for bubbles forming on the surface and for the edges to start drying out. This is your cue that it’s time to flip. That way, you’ll avoid any pancake disasters and end up with a lovely golden brown finish. Happy cooking!
Batter Consistency Tips
How do you achieve the perfect batter consistency for gluten-free, dairy-free pancakes? Start by mixing your dry ingredients thoroughly, including xanthan gum if your flour lacks it. Gradually add milk to avoid lumps. Aim for a thick but pourable batter that’s smooth and homogeneous. Using ingredients with natural prebiotic content can also support digestion even if the pancakes are gluten- and dairy-free.
Follow these key steps:
- Adjust thickness by adding 1-2 tablespoons of extra milk if too thick or 1-2 tablespoons of gluten-free flour if too runny.
- Let the batter rest for 5-20 minutes to hydrate the flour fully. This prevents graininess and ensures proper texture. Resting the batter is especially important in gluten-free recipes to balance texture and stability.
- Test the first pancake. It should spread nicely and form bubbles before flipping, indicating the right consistency.
Optimal Cooking Temperature
Achieving the right batter consistency sets the stage for cooking gluten-free, dairy-free pancakes perfectly, but controlling the heat during cooking makes all the difference.
Set your griddle or pan between 325°F and 350°F for optimal results. Medium heat on stovetops usually matches this range—around setting 4.
Almond flour-based pancakes burn easily above 350°F due to fat content, so avoid high heat. Preheat your cooking surface fully and test with the first pancake to fine-tune temperature.
Using a versatile flour blend like Cathy’s Gluten-Free All-Purpose Flour Blend ensures better texture and binding, which contributes to cooking success. Use light greasing and watch for oil shimmering without smoking. Maintain medium-low heat to prevent burning, letting the dairy-free butter sizzle gently.
Monitor bottom color by lifting edges to ensure golden-brown doneness. Adjust temperatures as needed, remembering that different burners and pans may require specific tweaks for even cooking.
Flipping Without Breaking
Flipping gluten-free, dairy-free pancakes without breaking requires patience and attention to visual cues.
To achieve perfect flips, follow these key steps:
- Wait for air bubbles to form across the top surface and ensure the edges look defined and set before flipping. This signals the pancake is cooked enough to hold together.
- Confirm the bottom is golden brown, usually after about two minutes, to avoid undercooking or sticking.
- Use a thin, flexible spatula to gently lift and turn the pancake in one smooth motion, minimizing breakage.
Additionally, grease your non-stick pan well with coconut or avocado oil to prevent sticking. Portion batter evenly with a 1/4 cup scoop for manageable sizes. Using medium heat helps moisture evaporate properly, creating fluffy pancakes that hold their shape when flipped.
These techniques ensure your pancakes flip cleanly and cook evenly every time.
Flavor Variations for Gluten Free Dairy Free Pancakes
Why settle for plain pancakes when you can easily customize gluten free dairy free pancakes with a variety of flavorful additions? You can mix in fresh fruits like blueberries or mashed bananas for natural sweetness and nutrition. Using the right mixing bowls can also influence your batter texture and consistency.
Adding nut butters such as almond or cashew enriches the batter, while cacao powder or chocolate chips bring a chocolate twist. Spice things up with vanilla extract, cinnamon, or powdered ginger to deepen flavor profiles. For a fluffy American-style texture, consider using almond flour and almond milk as core ingredients.
For a savory approach, try pesto or dairy free cheese with chickpea or buckwheat flour bases, adjusting salt accordingly. Experimenting with alternative flours like coconut, sorghum, or cassava also changes texture and taste.
This gives you endless options to suit your preferences while keeping your pancakes gluten and dairy free.
Serving Ideas and Toppings for Gluten Free Dairy Free Pancakes

Once you’ve crafted your gluten free dairy free pancake batter with your preferred flavors, consider how toppings and serving ideas can elevate your meal.
Thoughtful additions not only enhance taste but also improve texture and nutrition. For example, using Simple Mills Pancake + Waffle Mix as a base ensures a grain-free and dairy-free foundation that complements various toppings. Here are three options to try:
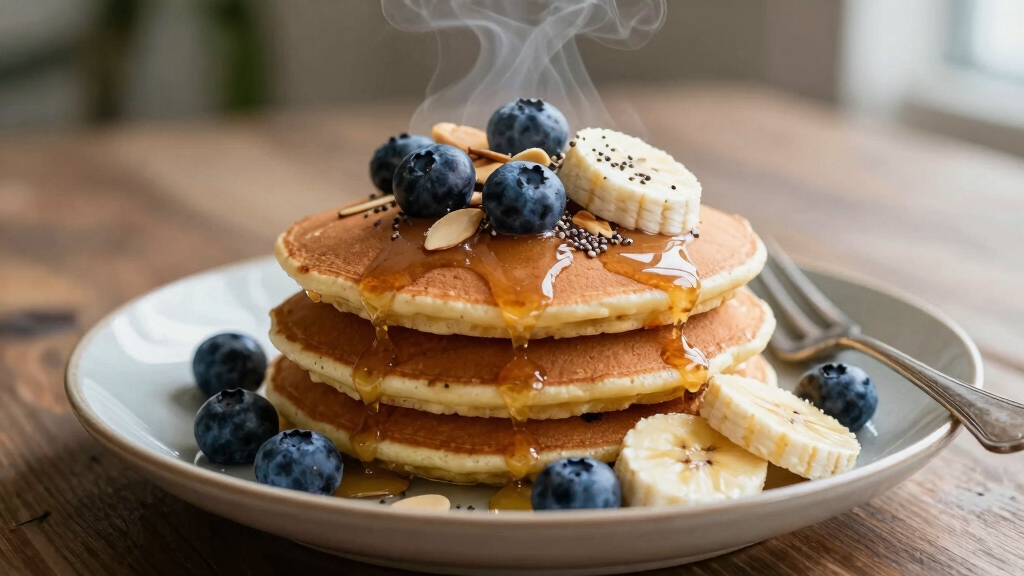
- Fruit and Sweet Syrups: Top with fresh berries like raspberries or blueberries, and drizzle with pure maple syrup verified gluten-free for a classic, sweet finish.
- Nut and Seed Enhancements: Spread nut butter on warm pancakes or sprinkle chopped nuts and shredded coconut for added crunch and protein.
- Savory and Umami Choices: For a unique twist, add smashed avocado with lime juice or lemony onions on chickpea flour-based pancakes, balancing flavors while keeping it dairy-free.
These ideas offer versatile ways to enjoy your pancakes while respecting dietary needs.
Frequently Asked Questions
How Do I Store Leftover Gluten Free Dairy Free Pancakes?
You should store leftover gluten-free dairy-free pancakes in an airtight container to keep them fresh for 3-4 days in the refrigerator.
Let them cool completely before storing to avoid sogginess.
If freezing, separate each pancake with parchment paper and flash freeze for 10 minutes before placing them in freezer-safe bags or containers.
Label with dates and store up to 3 months.
For reheating, microwave with a moist paper towel or use a toaster for crispiness.
Can I Freeze Gluten Free Dairy Free Pancakes for Later Use?
Absolutely, you can freeze gluten-free dairy-free pancakes for later use.
For example, a busy mom doubled her batch, layered pancakes with parchment paper, and stored them in labeled freezer bags.
Evidence shows freezing up to three months preserves quality well. Just reheat directly in a toaster or microwave.
This method maintains texture and flavor, making your pancakes just as delicious when you’re ready to enjoy them again.
Are These Pancakes Suitable for Nut Allergies?
Yes, these pancakes can be suitable for nut allergies if you avoid nut-based ingredients like almond or cashew milk.
Use seed-based alternatives like sunflower or pumpkin seed milk instead.
Always check your gluten-free flour blend for hidden nut additives and ensure your baking powder is gluten- and aluminum-free.
Be mindful of cross-contamination risks in manufacturing. If in doubt, consult a healthcare professional to confirm safety for your specific allergy needs.
What Is the Best Pan Type for Cooking These Pancakes?
You absolutely need a non-stick skillet or griddle. It’s like the superhero cape for your pancakes, preventing disaster with every flip.
Medium heat and a lightly oiled surface ensure even cooking without sticking. This combo guarantees fluffy, perfectly browned pancakes every time.
While cast iron works, non-stick is easier to manage and preserves your batter’s delicate texture. So grab that non-stick pan and get ready to impress your taste buds!
How Can I Make These Pancakes Ahead for a Busy Morning?
You can make these pancakes ahead by cooking them completely, then letting them cool fully before storing.
Stack them flat in an airtight container in the fridge for up to 5 days or freeze in a single layer on a tray.
Then transfer to a freezer bag for up to 3 months. When ready, reheat in a toaster, microwave, or skillet.
This method keeps them fluffy and saves time on busy mornings.
Toppings That Upgrade Your Gluten Free Dairy Free Pancakes
Now that you’ve mastered these gluten free dairy free pancakes, imagine starting your weekend with a stack that’s light, fluffy, and allergy-friendly. Just like Sarah, who switched to this recipe to accommodate her son’s sensitivities.
By using the right substitutes and mixing techniques, you can enjoy breakfast without compromise. Keep experimenting with flavors and toppings to make it your own. With these tips, perfect pancakes are always within reach, nourishing and delicious every time.